HubSpot REST API Integration Testing Guide
When setting up a new HubSpot integration using the REST APIs, it can be challenging to test and confirm that video viewing data is indeed being delivered to HubSpot. In this topic, you will learn how to systematically test and confirm that the integration works and that viewing data and leads are being sent to HubSpot.
Before you get started
Before validating the integration it is assumed you have:
- Successfully completed the Brightcove Campaign integration with HubSpot
- Created at least one Campaign-enabled player and configured it to use the HubSpot connection
Configuring a test lead form and publishing a video
For testing purposes, you will need to create and configure a custom lead form in Campaign. This is a HubSpot form whose embed code you have pasted into Campaign. Even if you will not be using lead forms in your production environment, this lead form is used to be sure that you are known in your database and on the page. To create a HubSpot form and configure Campaign to use it, follow these steps.
- Login to your HubSpot account.
- Create and style a HubSpot form. For information on creating a HubSpot form, see Creating Custom Lead Forms for HubSpot.
- Click Share at the top of the page.
- Copy the form embed code to the clipboard.
- Return to the Campaign module.
- Create a new lead form using the HubSpot form embed code.
- Set your custom form to display the form at the 5 second mark. This way you will know exactly when it should appear.
- Check the box to Always show the lead form even if the lead is already known. This will ensure the form continues to display after filling it out during testing.
- Save the form.
- Configure the Brightcove Player with the HubSpot connection to use the HubSpot lead form that was just created.
Generating a preview link to view the video
To generate a preview link to the video, follow these steps.
- Open the Media module.
- Select a video and publish it to a web player. Make sure to select the Campaign-enabled player with the lead form.
- Click the preview link to open the video in a new browser window. Testing this way eliminates any potential variables that could be introduced by players embedded on a HTML pages.
- Confirm that the video plays and that the lead form displays at the 5 second mark.
- Fill out the lead form using unique contact info and email address (i.e. a celebrity name or a name containing the words “bctest”) so that it can be easily found later in HubSpot. This eliminates any browser, player or database level variables. By filling out the form as a new user, we can be sure you are now a known user in HubSpot.
Confirming that Campaign is successfully capturing the data
Before looking for video viewing data in HubSpot, first confirm that Campaign has indeed captured the video view. Note that viewing data may take up to 3 hours to display in the Campaign UI. To confirm that Campaign is successfully capturing the data, follow these steps.
- Open the Campaign module.
- Click All Recent Activity in the left navigation.
- Confirm that there is an event with a recent timestamp showing the name of the video that was just watched. The event status should be unprocessed. This indicates that Campaign has captured the view but has not yet attempted to sync it to HubSpot.

- To manually trigger a sync between Campaign and HubSpot, click Synchronization Activity in the left navigation.
- From the Select Connection dropdown list, select your HubSpot integration. A button should appear.
- Click to trigger a manual sync. Note that you are limited to how often you can trigger a manual sync. By default, Campaign will sync views to HubSpot once an hour.
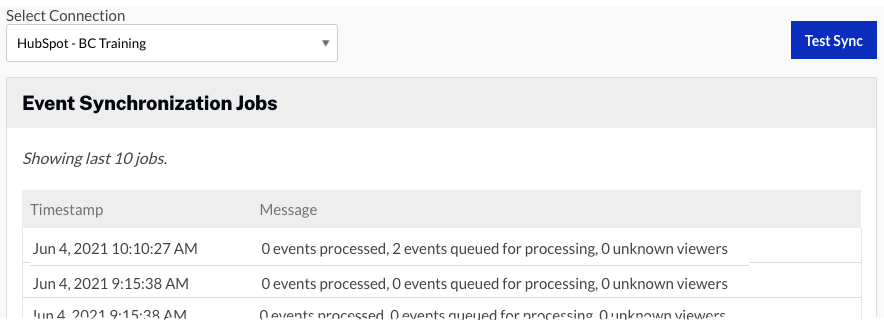
- Click All Recent Activity in the left navigation.
- The status of your view event will be queued. It may take 15 minutes or so for the data to actually sync to HubSpot. Once the data does sync, the status will change to one of two statuses:
- synced - Indicates the user was a known user and data was successfully delivered to their activity log. The data should also be viewable in HubSpot within a few minutes.
- unknown_contact - Indicates the user was considered unknown and HubSpot was unable to accept the data. If you get an unknown_contact status, check that you published the video using the correct player, have a HubSpot form in place and are testing using the preview link, not embedded in a page.
Confirming that the video view data is in HubSpot
Once Campaign has displayed a synced status, follow these steps to verify that the data is in HubSpot.
- Login to your HubSpot account.
- In HubSpot navigate to the Contacts area and locate the unique name or email address you used when filling out the lead form.
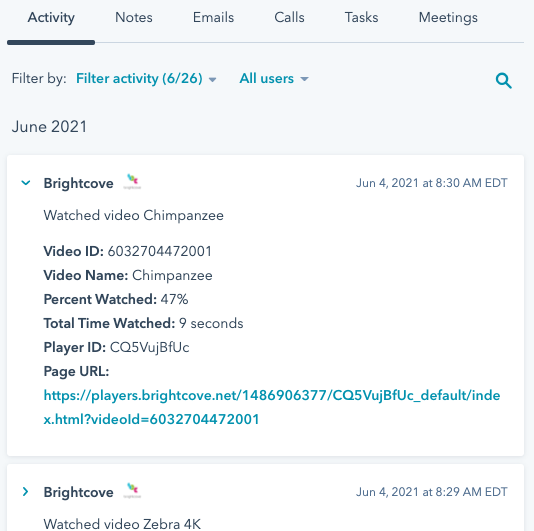
- Click on the contact to open up the Activity log.
- Click on the Filter activity dropdown (top of the page below the Activity menu) and confirm that Brightcove Video Connect is checked. This will ensure that video viewing activity is displayed in the activity log.
- In the activity log, look for a Brightcove activity. Expand the details to view the data for the video view event.
HubSpot requires data being delivered via their API to be assigned to a known contact. HubSpot will only accept data of known contacts. Data of unknown contacts will not be synced. If you don't use lead forms, there is no way for an unknown user to convert to a known user and thus no data will be synced.