Working with 360° Videos
360° videos are video recordings where a view in every direction is recorded at the same time. 360° videos are shot using an omnidirectional camera or a collection of cameras. During playback the viewer has control of the viewing direction like a panorama.
supports uploading and publishing of 360° videos. A sample 360° video is shown below. Once you play the video, you can use your mouse to control the view on the desktop, or the gyroscope if viewing on a mobile device.
For information on browser support and known issues with the 360°/VR video plugin, see the 360º/VR Video Plugin topic.
Recording 360° videos
360° video is typically recorded using either a special rig of multiple cameras or using a dedicated camera that contains multiple camera lenses. The resulting footage is then stitched to form a single video. There are many cameras available to record 360° video. The 360° video in this topic was recorded using a Ricoh Theta S. Brightcove recommends recording your video at a high resolution.
Before you upload
Before you upload a 360° video to , the video file needs to include certain metadata for 360° playback to be enabled. The Spatial Media Metadata Injector application can be used to add metadata to a video file indicating that the file contains 360° video. If the 360° video was recorded on a camera that doesn't automatically add the 360° metadata, follow these steps to add it:
- Download the 360° Video Metadata app for Mac or Windows.
- Install and then open the 360° Video Metadata app.
- Click Open and then select the video file.
- Click Inject metadata.
- Enter a name for the new file and then click .
The video is now ready to be uploaded to .
Uploading 360° videos
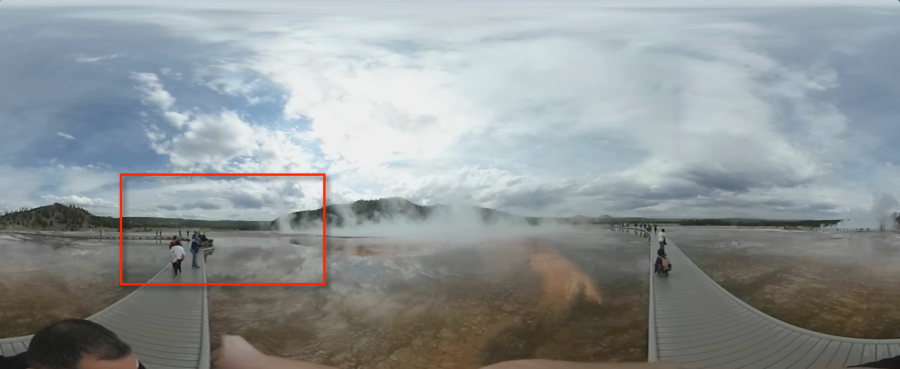
360° video is filmed to be projected on the interior of a sphere. This means that the visible area of the video in the player is only a fraction of the entire video. The following screenshot gives you a rough idea of this concept. The area inside the red rectangle is what is visible in the player, but it is only a small part of the entire video.
Since only a small part of the video will be in the player at any one time, you want a very high quality rendition to be playing, with no chance of a lower quality rendition appearing. In essence, you are "zooming in" on part of the video and a poor quality rendition would yield a very poor quality viewing experience. When uploading your video, Brightcove recommends creating a custom Dynamic Delivery ingest profile with a single 1080p rendition and at least one audio rendition.
360° video properties
All videos have a set of properties that can be set using Studio or programmatically using the CMS API. Note that not all of the properties are exposed in Studio.
To indicate that a video is a 360° video, use the Media module to edit the video properties and set the Video Projection property to 360°.
Publishing 360° videos
Brightcove provides several ways you can publish 360° videos:
Publishing 360° videos to web pages
To play 360° videos in a Brightcove Player, the player requires the 360°/VR Video Plugin.
To create a new Brightcove Player with the 360°/VR Video Plugin, follow these steps:
- Open the Players module.
- Create a new player.
- Click the player name to open the player properties.
- Click Plugins in the left navigation.
- Click > Custom Plugin.
- For the Plugin Name, enter vr.
- For the JavaScript URL, enter:
https://players.brightcove.net/videojs-vr/2/videojs-vr.min.jsIf you are using Brightcove Player 6, use this URL instead:
https://players.brightcove.net/videojs-vr/1/videojs-vr.min.js - For the CSS URL, enter:
https://players.brightcove.net/videojs-vr/2/videojs-vr.cssIf you are using Brightcove Player 6, use this URL instead:
https://players.brightcove.net/videojs-vr/1/videojs-vr.css - No Options(JSON) are needed.
- Click and then publish the player.
You can now publish the 360° video using the player that was just created.
Note: To use the 360°/VR Plugin, you must be using Brightcove Player version 6.13.0 or later.
Publishing 360° videos using Brightcove Social
360° videos uploaded to your account can easily be published to your social media accounts using Brightcove Social. Note that when using the Social module to sync a 360° video, the ingest profile used to ingest the video must be configured to save the master file or the video won't sync in 360°. When ingests 360° videos, the 360° metadata isn't retained in the resulting renditions. When syncing a 360° video without a master, the highest quality rendition is used in the sync. As the rendition doesn't include the 360° metadata, YouTube/Facebook won't know it's a 360° video.
For information on publishing videos using Brightcove Social, see Publishing Videos to Social Media Platforms.
Publishing 360° videos using the Brightcove Native Player SDKs
Android and iOS apps built using the Brightcove Player SDKs can play 360° videos. For information on publishing 360° videos with the SDKs, see the Using 360° Videos with the Native SDKs document.