AI Content Multiplier
The AI Content Multiplier repurposes a source video in two ways:
- Highlights — the AI selects the most engaging moments and generates short clips, optionally reframing them to a different aspect ratio.
- Reframing — the full video is preserved and only reframed to a different aspect ratio (no highlights are extracted).
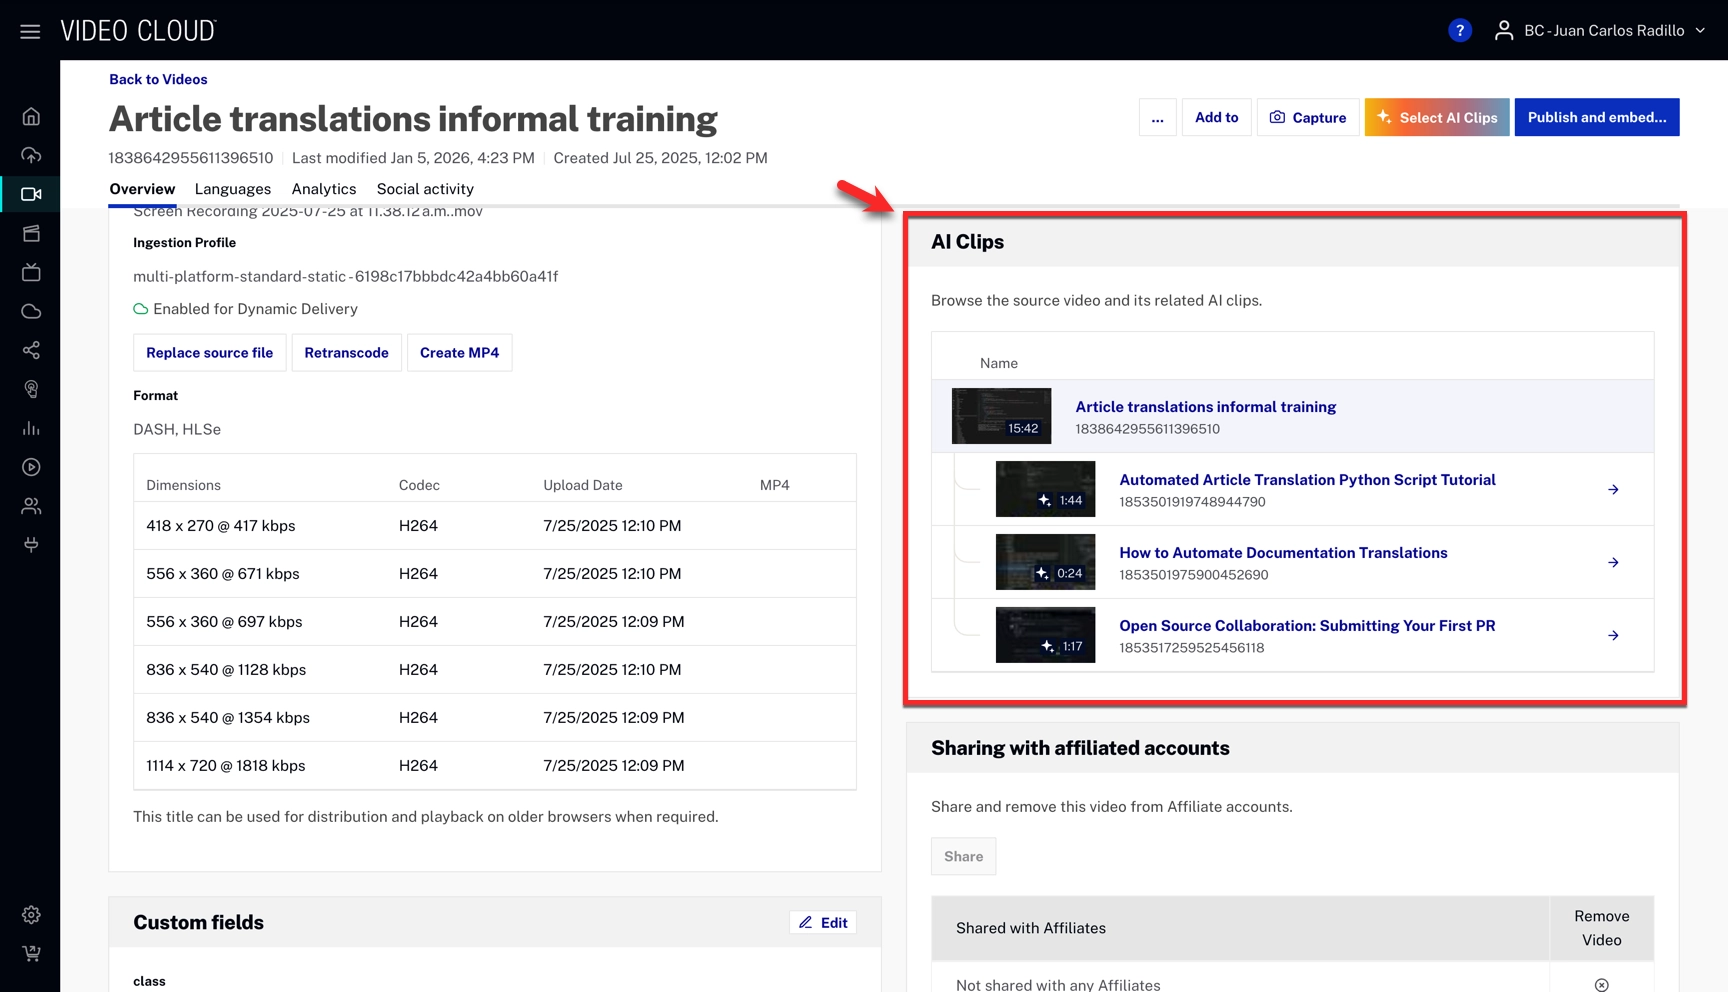
Generated clips can be previewed, downloaded, or ingested to become full-fledged Brightcove videos.
Setting up templates
Templates allow you to predefine a collection of settings that are reused whenever clips are generated.
Creating a new template
- In the Admin module, go to AI Clips Generation.
- Click New Template +
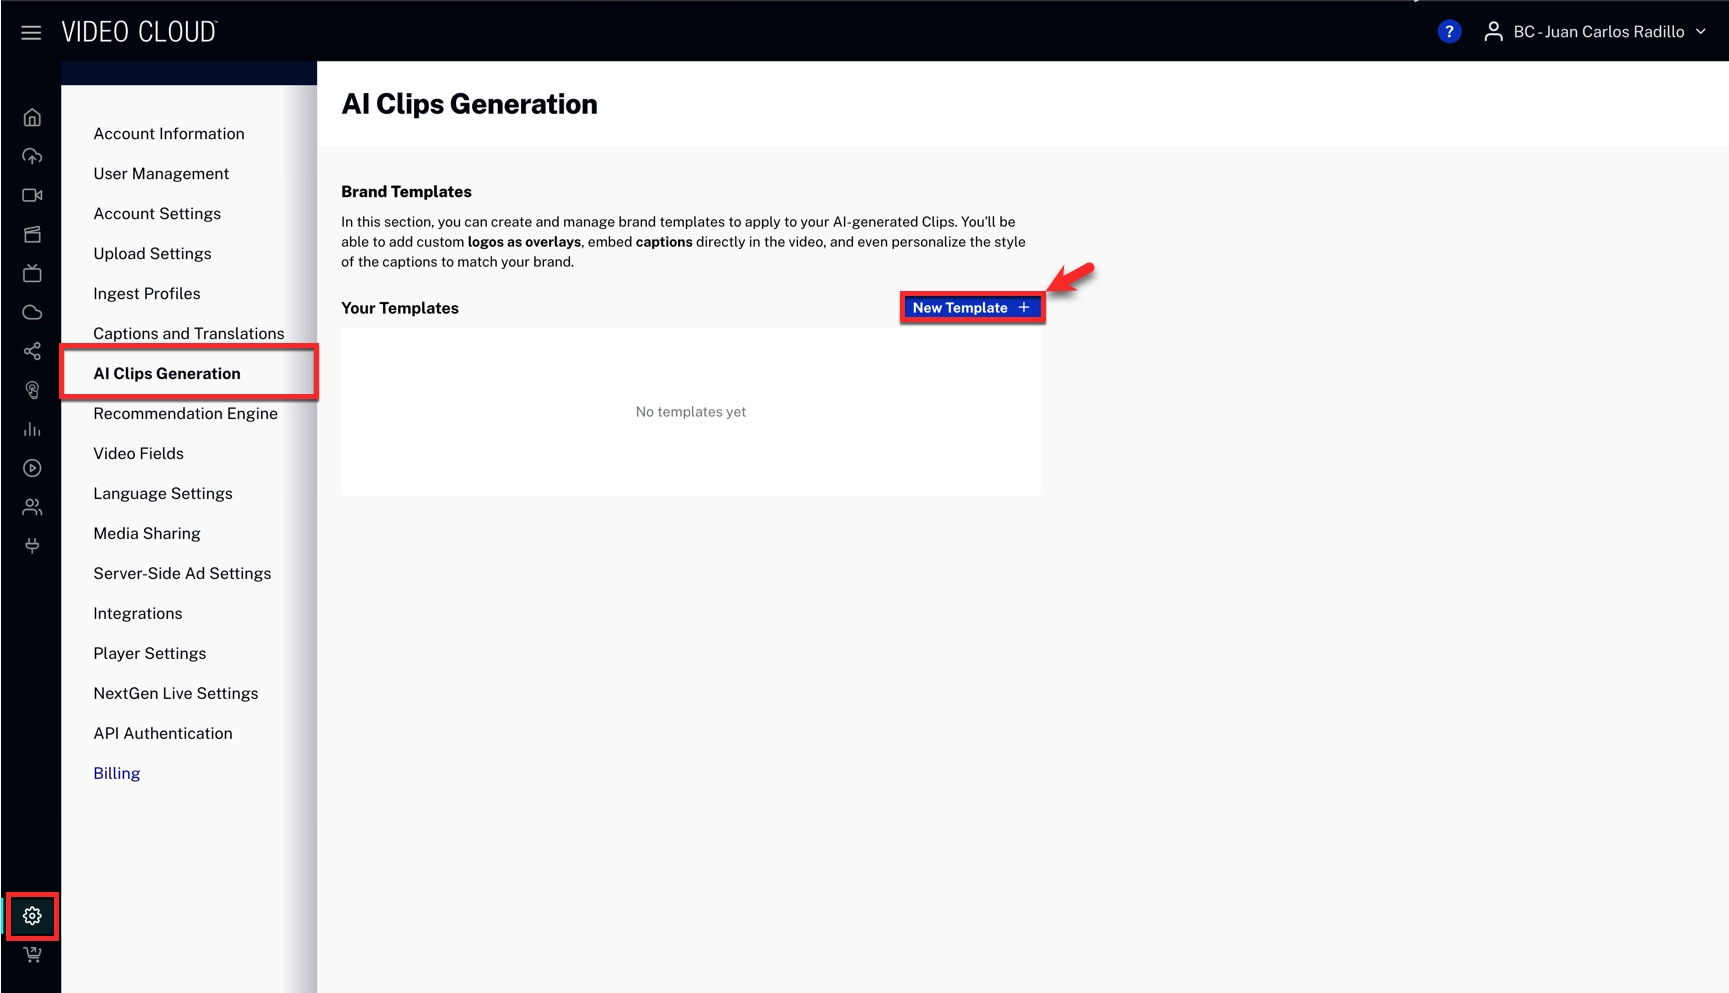
- Configure your template settings and click Add

Template settings
| Setting | Description |
|---|---|
| Template name | Name displayed in the template list before starting clip generation. |
| Ratio | One of four supported aspect ratios. Only templates with a matching ratio are available when generating clips. |
| Logo settings | Optional logo overlay settings, including logo file, size, position, and spacing from margins. The logo is displayed for the entire duration of the clip. |
| Intro / Outro video | Optional videos shown before or after the clip. If aspect ratios differ, intro and outro videos are resized to fit entirely within the clip while preserving their original aspect ratio. |
| Captions | Toggle to enable or disable embedded captions. Additional settings customize caption appearance. Updating any caption setting triggers a preview refresh. |
Generating AI Clips
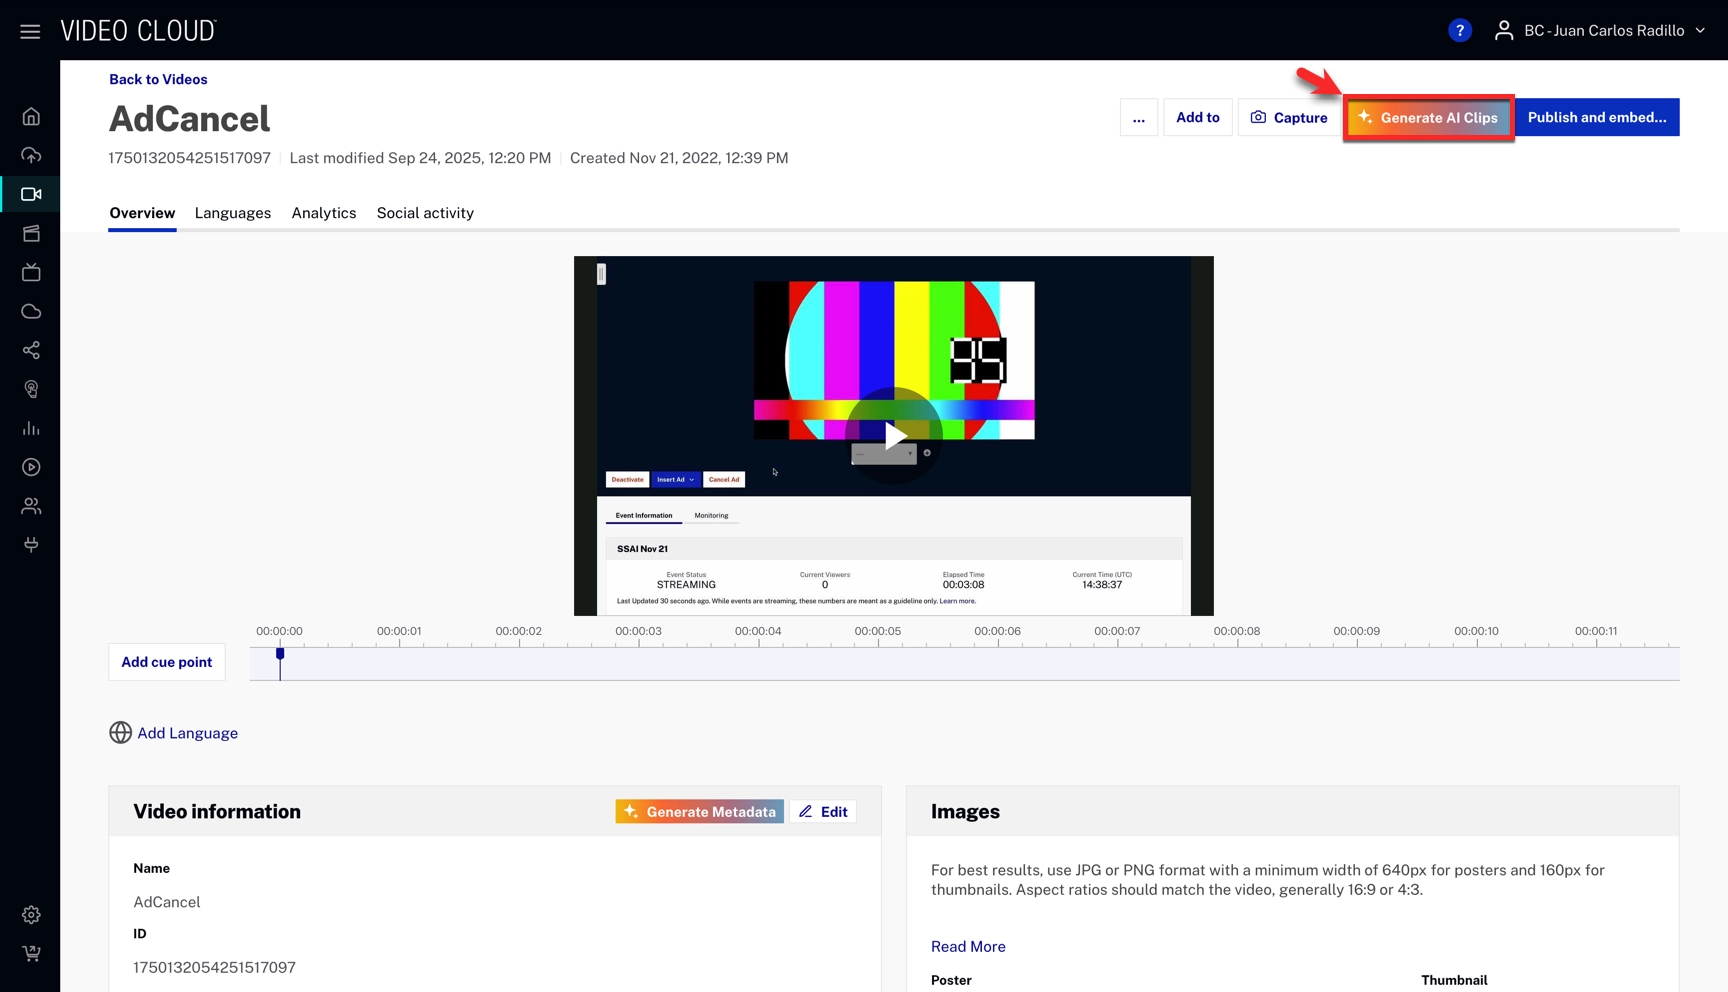
- In Video Cloud Studio, open the Media module.
- Click on a video title to open the Video Details page.
- Click the Generate AI Clips button in the top-right corner.
Generation settings
AI Clips generation options Setting Description Mode Select what the AI Content Multiplier should do with your video. - Highlights: the AI selects the most engaging moments from the video and generates short clips. Reframing is also applied if a different aspect ratio is selected.
- Reframing: the entire video is kept and only reframed to the selected aspect ratio. No highlights are extracted.
Aspect ratio One of four available aspect ratios. Layout Fill: video may be cropped
Fit: video is resized with a blurred background
Automatic: AI selects the best layout, including split layouts for multiple speakers.Processing timeframe Restricts clip generation to a specific segment of the video. Clip length Constrains the duration of generated clips. Clip focus Optional prompt describing what content should be included or excluded. Clip style Select a template. Only templates with a matching aspect ratio are shown. Default templates are always available under Quick Presets. -
Click Generate to start clip generation.

Selecting and modifying AI Clips
Once generation is complete, you can preview and decide which clips to download or ingest.
- Go to the Media module and select the source video.
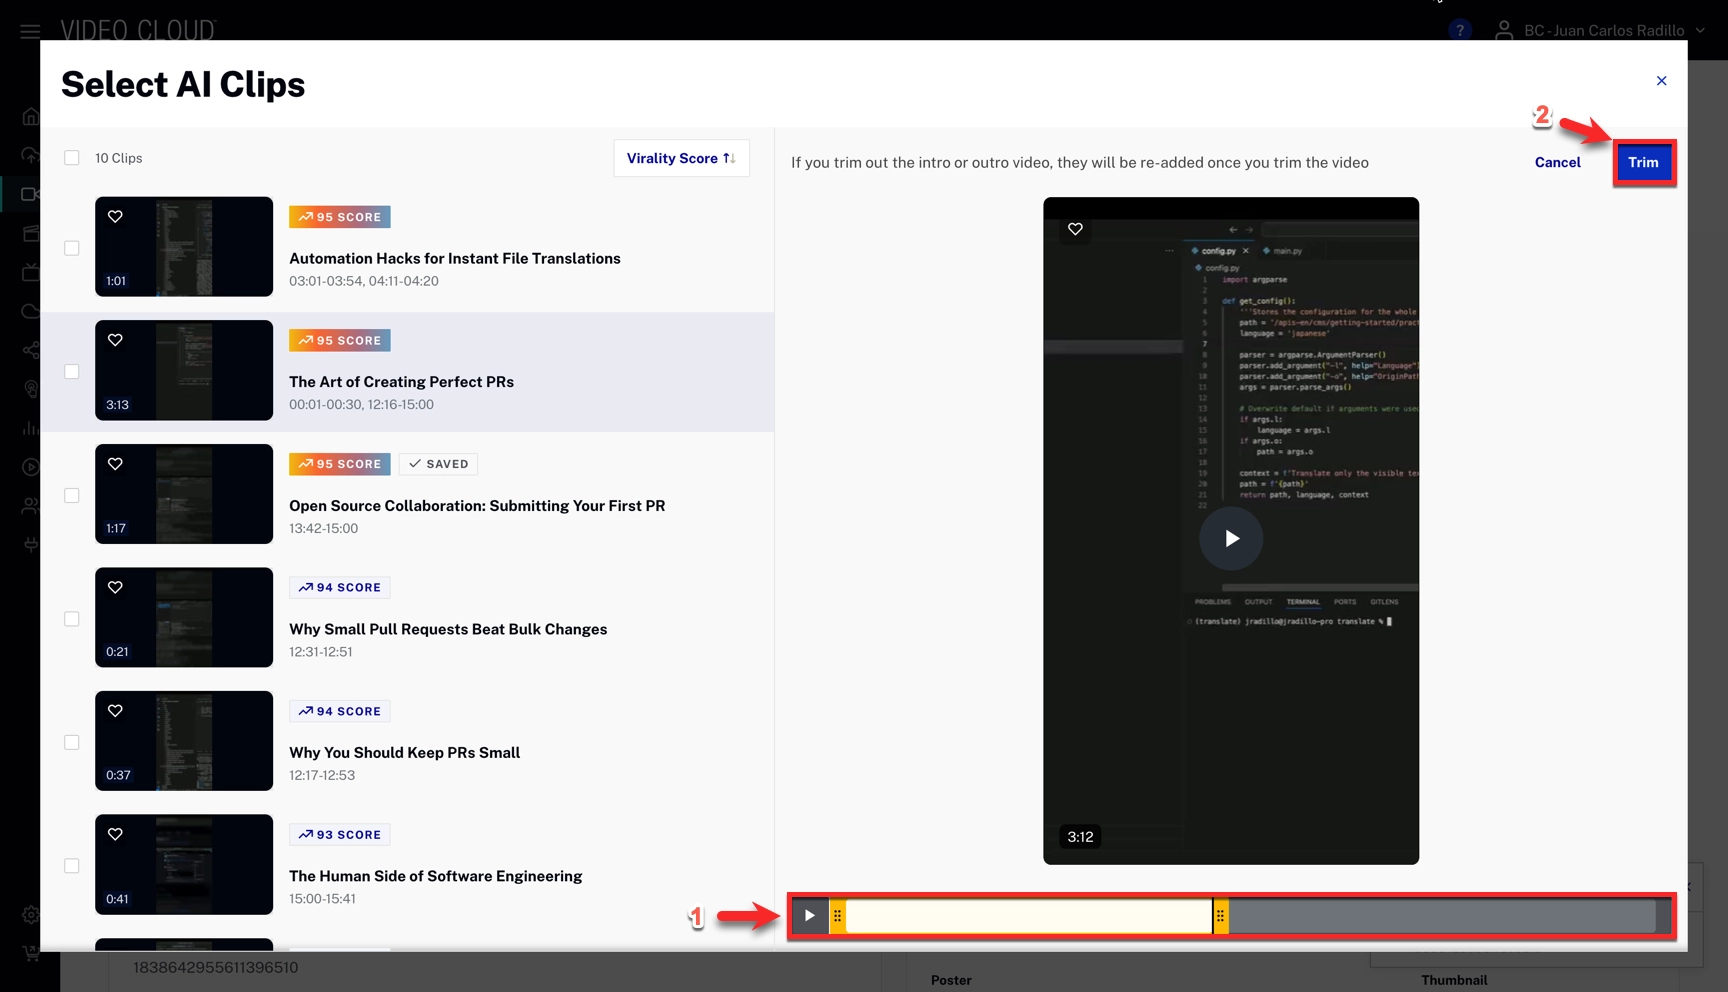
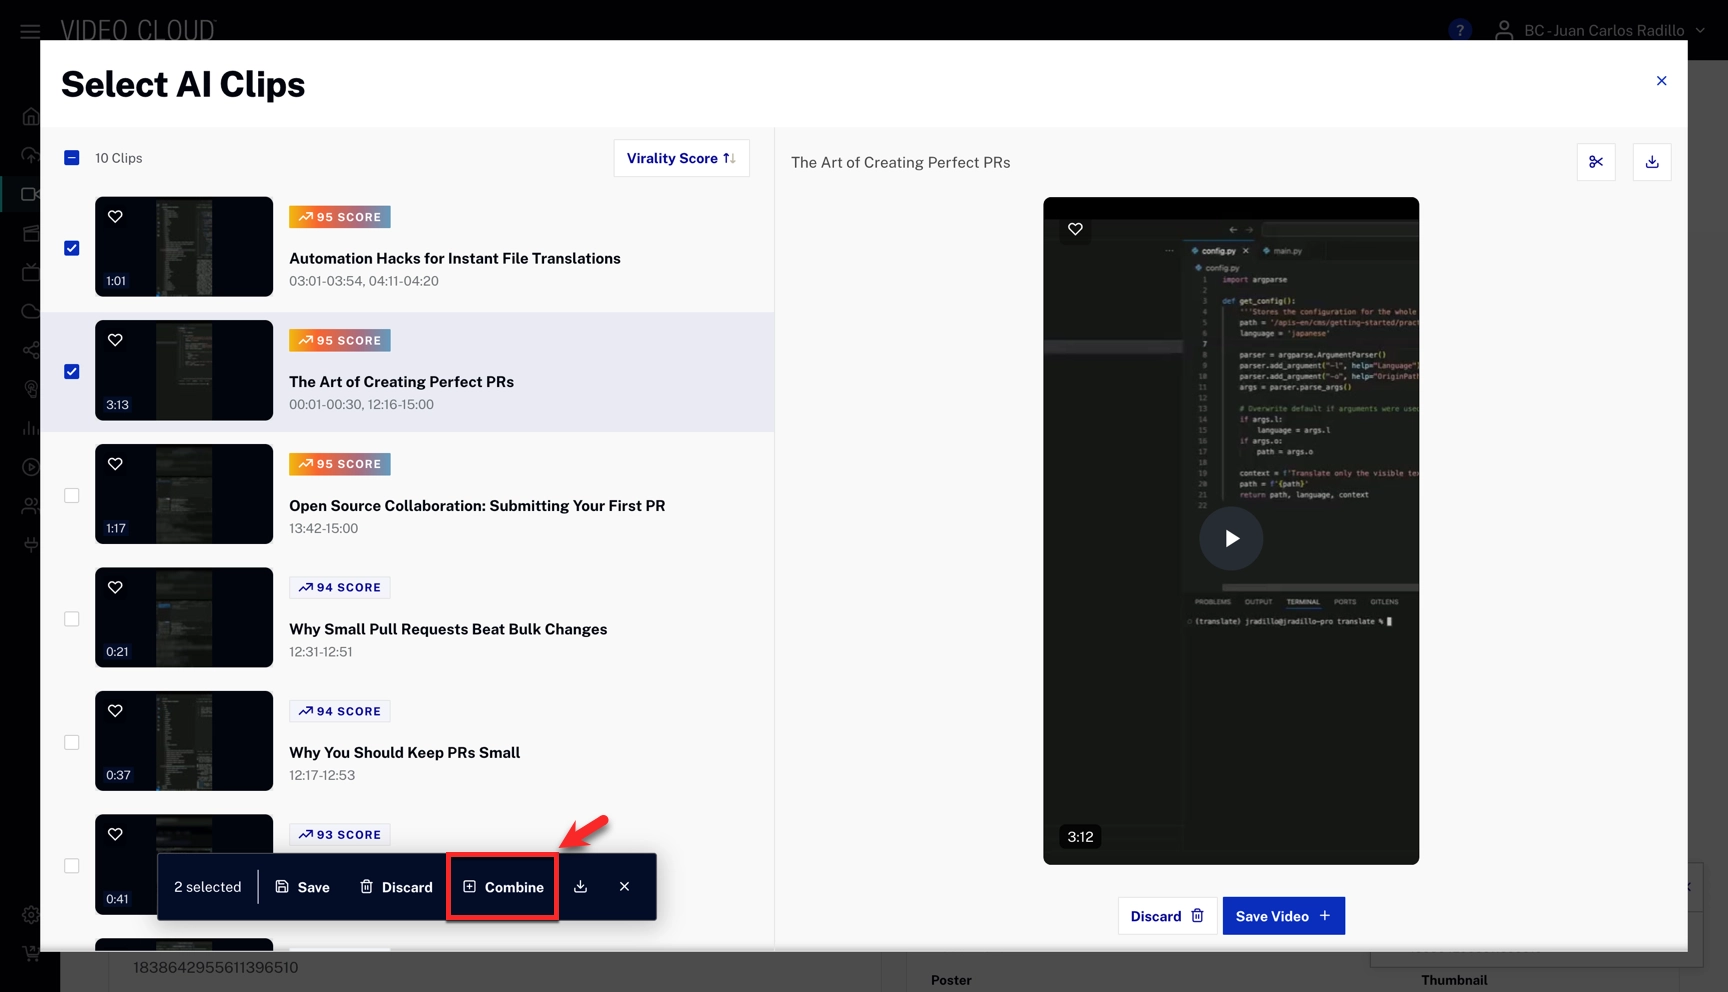
- Click Select AI Clips in the top-right corner.

The Select AI Clips modal displays a list of generated clips on the left and a preview player on the right. The bottom action bar shows bulk actions for any selected clips.

Sorting clips
Use the sort control at the top of the clip list to order clips by Virality Score, Liked, or Duration. The virality score estimates how engaging a clip is based on emotional impact, trend alignment, shareability, and narrative clarity.
Available clip actions
Each clip card and the bottom action bar expose the following actions:
- Preview — click a clip in the list to load it in the right-hand player.
- Like — click the heart icon on a clip card to mark it for future reference.
- Trim — with a clip selected, click the scissors icon above the preview player to trim the clip (see Trimming a clip below).
- Download — click the download icon above the preview player to save the clip to your device.
- Save Video — click Save Video below the preview to ingest the clip into your video's AI Clips section.
- Discard — click Discard below the preview to remove the clip from the selection. The bottom action bar also offers bulk Discard for multiple selected clips.
- Combine — select two or more clips, then click Combine in the bottom action bar to merge them into a single video (see Combining clips below).
Trimming a clip
- Select a clip and click the scissors icon above the preview player.
- Drag the trim handles on the timeline to set the new start and end points, then click Trim.
Combining clips
Select two or more clips, click Combine in the bottom action bar, enter a name for the combined output, and click Combine.
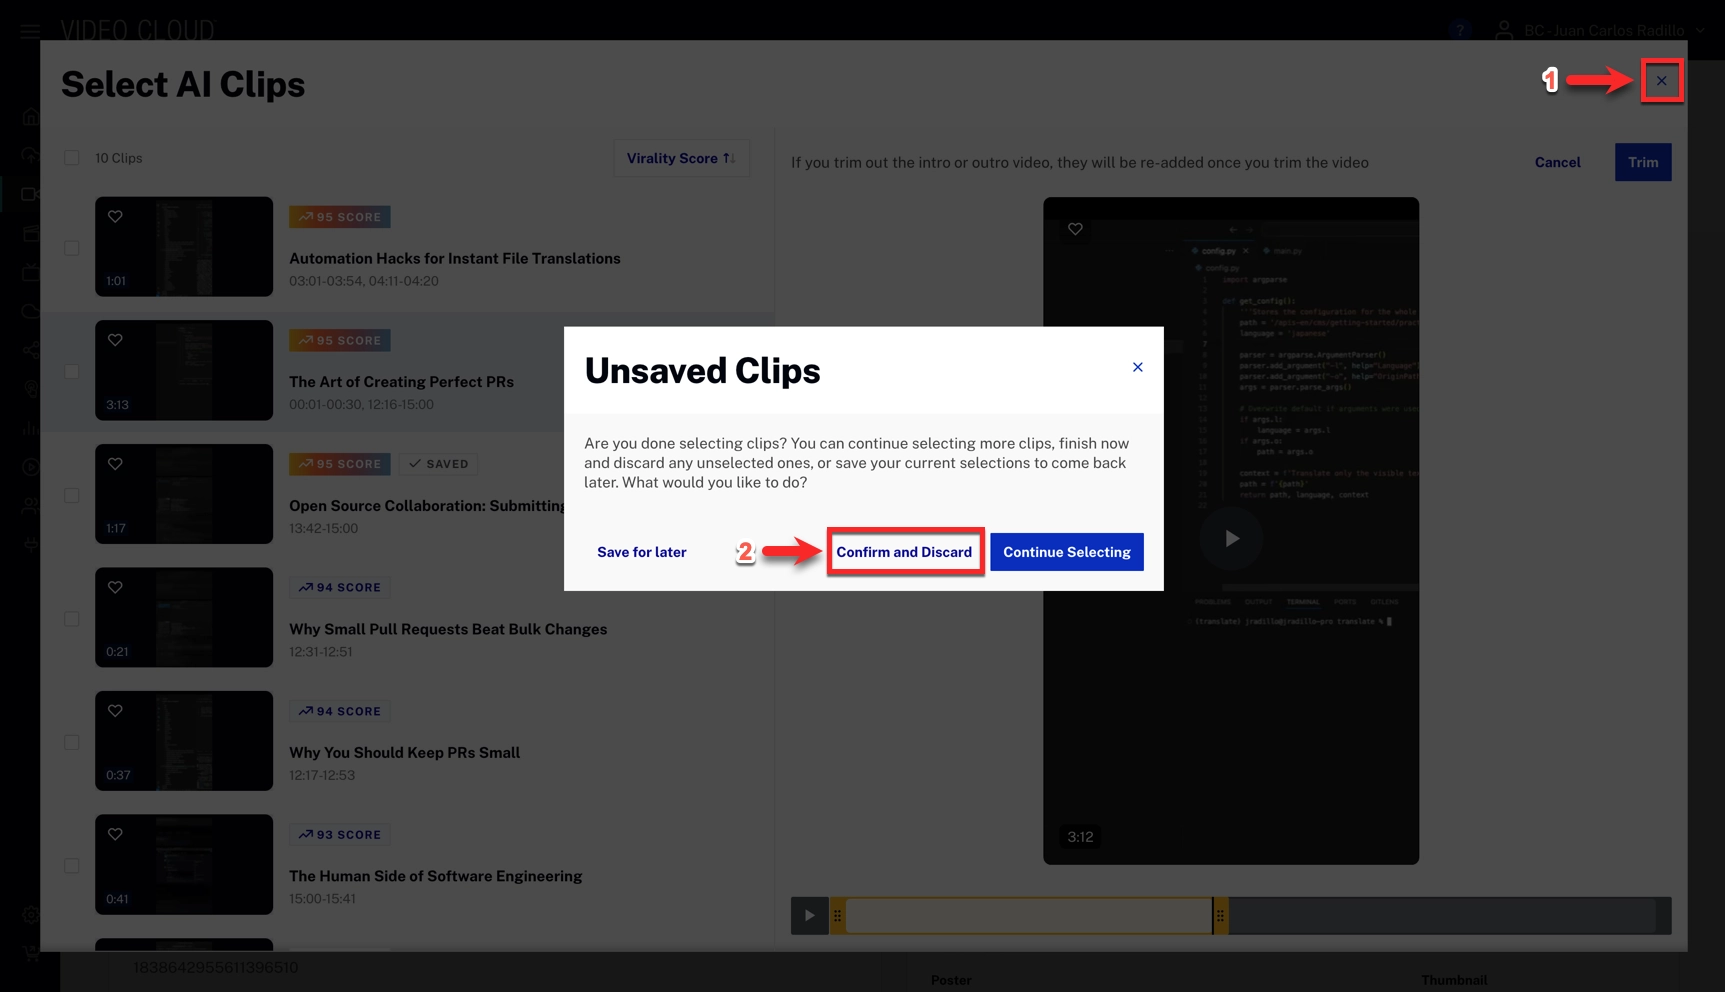
Generating more clips
To generate more clips for a video that already has generated clips, close the Select AI Clips modal and click Confirm and Discard in the Unsaved Clips dialog. This discards all unsaved clips and lets you generate clips again from the Generate AI Clips button.
Finding clips in the media library
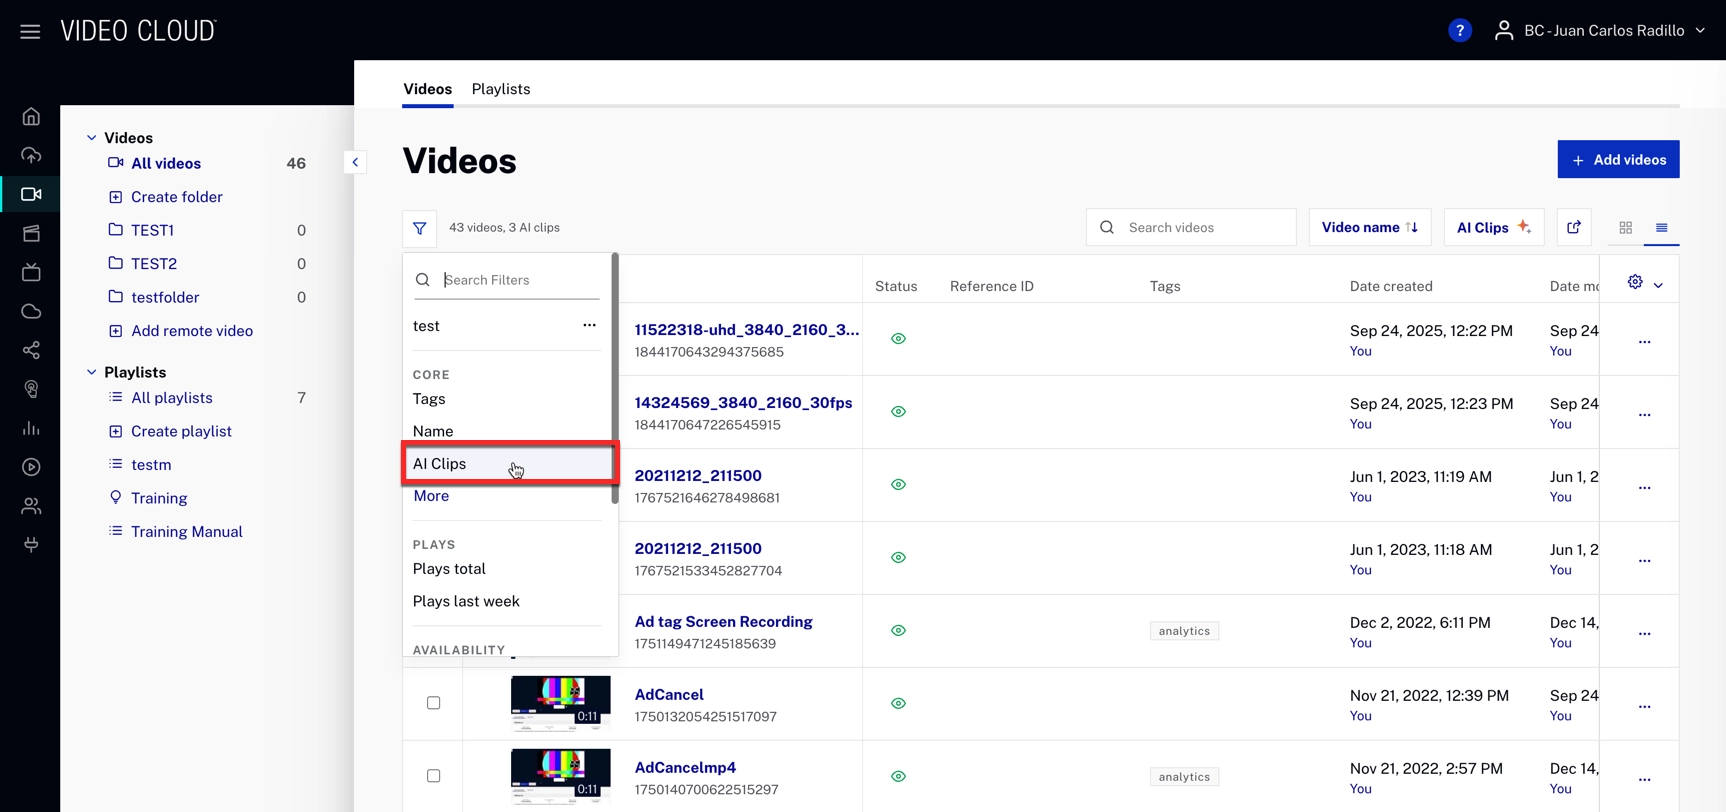
By default, ingested clips are hidden in the Media table. Videos that generated clips display an expand arrow next to their thumbnail; click it to reveal the associated clips. The AI Clips button above the table applies the Videos with AI Clips filter automatically.
Click the AI Clips filter chip to open the filter popup and select one of these options:
- Videos with AI Clips
- Videos without AI Clips
- Only AI Clips
Detaching clips
You can detach a clip from its parent video to create a standalone video. This will remove the clip's link to the original video, but it won't delete any content.
- Click the three-dot menu for a clip.
- Select Detach AI Clip from parent.
- Confirm by clicking Detach Video

API access
The AI Content Multiplier is available via the Ingest API. All endpoints require OAuth with scope video-cloud/video/read, except where noted.
Create / Get / Update / Delete AI Content Multiplier job
Endpoint:
POST | GET | PATCH | DELETE https://ingest.api.brightcove.com/v1/accounts/{account_id}/videos/{video_id}/ai/content-multiplier
Scope: video-cloud/video/read
POST – Create clip generation job
Starts AI clip generation for a video. Request body (all fields optional except as noted):
video_name: optional string. Used when combining multiple clips (e.g.video_id-1-3-5) as the name for the combined output.min_duration: optional integer. Minimum clip duration in seconds.max_duration: optional integer. Maximum clip duration in seconds.trim_start_time: optional number. Start time (seconds) for the processing window.trim_end_time: optional number. End time (seconds) for the processing window.template_id: optional string. ID of a saved template to apply.reframing_mode: optional string. One of:fill,fit,automatic(or as configured for the account).aspect_ratio: optional string. Target aspect ratio (e.g.9:16,1:1; values depend on account configuration).include_prompt: optional string. Prompt describing content to include in clips.exclude_prompt: optional string. Prompt describing content to exclude from clips.transition: optional string. Transition style when combining clips.is_extended: optional boolean. When using avideo_idwith clip indices (e.g.video_id-0), if true, uses extended clip URLs and segments from the parent job.
Response: job_id (string), job_status (e.g. processing).
GET – Get job status and output
Returns the content multiplier job for the given account and video. Response fields include:
account_id,video_id: stringsjob_id: string (workflow execution ID)status:processing|finished|failedoutput: array of clip objects. Each object may includeoutput_url,presigned_url,thumbnail_url,presigned_thumbnail_url,poster_url,presigned_poster_url,extended_clip_url,presigned_extended_url,title,segments_time,virality_score,template_id,liked,discarded,saved, etc.error: string (present whenstatusisfailed)
While the job is running, status is synced from the workflow; when status is finished, output contains the generated clips. Use the presigned URL fields (presigned_url, presigned_thumbnail_url, presigned_poster_url, presigned_extended_url) to download the corresponding assets; when available, these presigned URLs are the ones that should be used for downloads.
PATCH – Update job output (liked / discarded / saved)
Updates only user-editable fields on each clip in output. Request body:
output: required array of objects. Length must match the current job’soutputlength. Each object may contain onlyliked,discarded, and/orsaved(booleans). Other fields are ignored.
Response: the updated job object (same shape as GET).
DELETE – Delete job
Removes the content multiplier job for the account and video. Response: message (e.g. "Content multiplier job deleted successfully").
Get list of AI Content Multiplier jobs
GET https://ingest.api.brightcove.com/v1/accounts/{account_id}/ai/content-multiplier/jobs
Scope: video-cloud/video/read
Response: array of job objects (same shape as the single-job GET)
Get upload URLs for assets
Get presigned POST URLs for uploading assets (e.g. logos, intro/outro videos) used in templates.
GET https://ingest.api.brightcove.com/v1/accounts/{account_id}/ai/content-multiplier/upload-urls/{source_name}
Scope: video-cloud/upload-urls/read
source_name is the file name (or path) to use for the uploaded object. Response: signed_url (POST endpoint), url (S3 URI), form_fields (fields to include in the POST request).
Get / Update Content Multiplier templates
GET https://ingest.api.brightcove.com/v1/accounts/{account_id}/ai/content-multiplier/templates
Scope: video-cloud/video/read

PUT https://ingest.api.brightcove.com/v1/accounts/{account_id}/ai/content-multiplier/templates
Scope: video-cloud/dynamic-ingest/create
GET returns all templates for the account. Each template may include name, logo_url, presigned_logo_url, logo_size, logo_padding, logo_position, intro_asset_url, outro_asset_url, caption settings (captions_enabled, captions_font_name, captions_font_weight, captions_font_size, captions_fill, captions_stroke, captions_stroke_width, captions_background, captions_shadow, captions_color_highlight, captions_animation_type, captions_max_lines, captions_max_chars_per_line, captions_uppercase), aspect_ratio, updated_at.
PUT adds, updates, or removes templates. Request body:
add: optional object. Map of template name → template object (same fields as above). Adds or replaces templates.remove: optional array of strings. Template names to remove.
At least one of add or remove is required. Response: message (e.g. "Templates saved successfully").
CMS Video Details and clips
When using the CMS API (Video Details):
- Clips include a
clip_sourcefield with the ID of the source video. - Videos that have generated clips include a
clipsfield listing the IDs of derived clips.