Adding Audio Tracks to Videos using the Media Module
Videos can be configured with multiple audio tracks. Multiple audio tracks can be used to:
- Play back the same video in different languages
- Provide audio with descriptions for the visually challenged
- Provide stereo vs. multi-channel (surround sound) audio
Multiple audio tracks are supported for HLS V4+ and DASH - with and without DRM protection. Videos with multiple audio tracks will display a headphone icon (![]() ) in the controlbar. When the icon is clicked, the viewer can select between audio tracks.
) in the controlbar. When the icon is clicked, the viewer can select between audio tracks.
Notes:
- Audio source files can be in MP3, M4A, or WAV format.
- All audio tracks must be added using an ingest profile that generates the same audio renditions than the ingest profile that was used to upload the video.
- By default, the audio Language is set to English with a Variant type of main. The default can be changed by checking the default option (
 ) when editing the Audio Track.
 - When you add additional audio tracks to a video, they must all have the same bitrate/rendition profile to ensure successful playback in HLS (DASH playback will still work).
- Only one active ingest job is allowed on a video. Do not add an audio track until processing of the video has finished, and if you are adding multiple tracks, wait till each one has finished processing before adding another.
- If you set up your ingest profiles to save mezz files, they will not be removed when performing a re-transcode.
Below is an example of a video that has been configured with multiple audio tracks.
Adding audio track file
Audio track files can be uploaded and hosted by Brightcove or reside at an internet accessible URL. To view and edit the audio track properties for a video, follow these steps:
- Open the Media module.
- Click the video title link and, select the Tracks tab, then locate the Audio Tracks section. The audio track for the source video will appear.
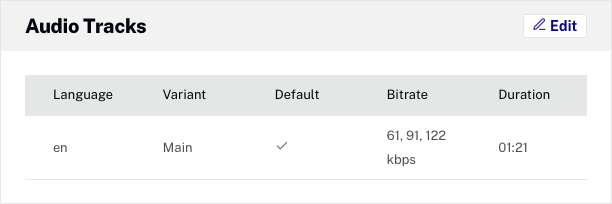
- Click or double-click in the section.
- Click
- Select if the audio track file will be uploaded from the local file system or from an external URL.
- File Upload - Click Browse and select the audio track file from the local file system. The file will be uploaded to .
- URL Upload - Enter the public URL where the audio track file resides and then click . The file will be uploaded to .

- The Language field should contain the language code that specifies the language of the track text data.
- Select the Variant of text track. The Variant describes the kind of audio track. Options include:
- main - The main track, usually the one muxed into the video file
- alternate - An alternate audio track
- commentary - An audio track that provides commentary on the video track
- dub - A track containing a dubbed version of spoken words in a different language
- descriptive - The track is descriptive of the video content in some way
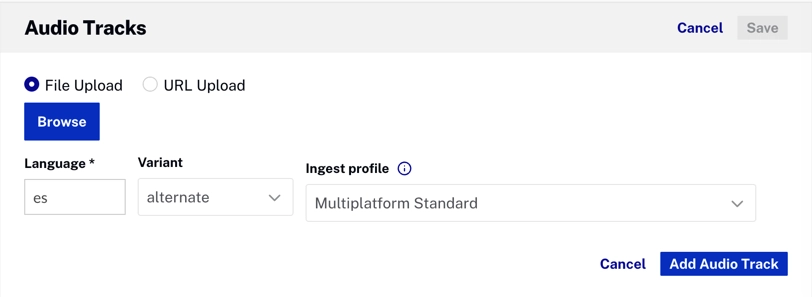
- Select Ingest Profile. To add an audio file, it must match the current audio file present. Brightcove suggests taking note of the ingest profile used for the video upload so that you know which profile to choose when you navigate to this upload location.
- Click to save the audio track information.
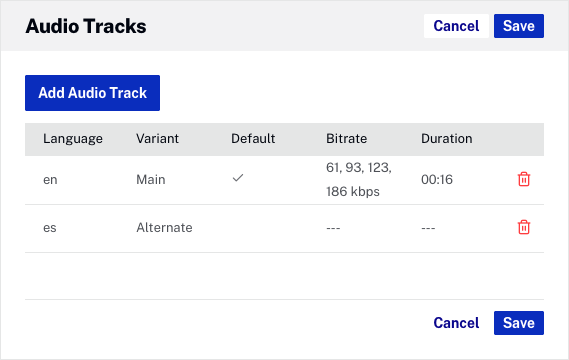
- Click to add another audio track or to save the audio tracks. The newly added audio tracks will appear in the list when processing is finished.
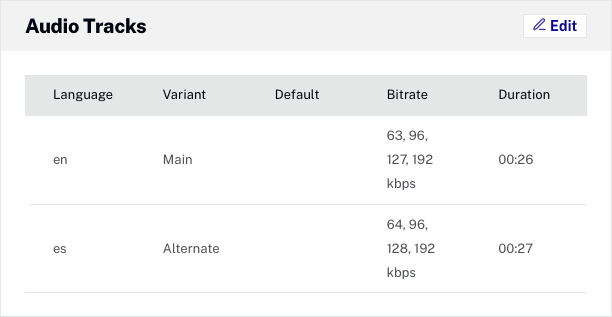
To delete an audio track, click the delete icon (![]() ) next to the audio track. Note that there may be a delay before the UI is updated and the audio track no longer appears.
) next to the audio track. Note that there may be a delay before the UI is updated and the audio track no longer appears.
When a video with multiple audio tracks is published, a headphone button (![]() ) will appear on the player chrome. Click the button to select an audio track.
) will appear on the player chrome. Click the button to select an audio track.

Setting a default audio track
When a video is uploaded, the source audio will be set as the main (default) track. To set an audio track to be the default track, follow these steps:
- Click or double-click in the Audio Tracks section.
- Click on the track that is currently the default audio track.
- Uncheck the Default option.
- Click on the track that will be set as the default audio track.
- Check the Default option.
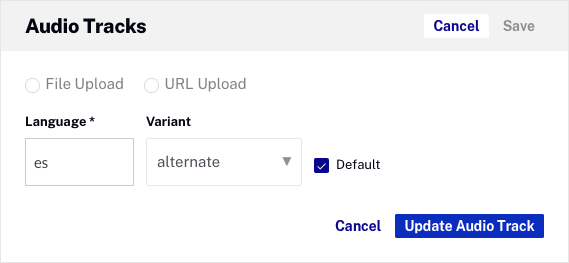
- Click .
Limitations
The following limitations apply when using multiple audio tracks
- Audio masters not stored
- If you retranscode the video from the video master, the additional audio tracks will be lost, and must be re-added
- Audio-only files must be used
- Audio tracks must be audio-only files without video tracks
- HLSv3, HLS with audio and video in the same segment
-
- The playback API will not return HLSv3 manifests
- All HLS manifests will include de-muxed video/audio
- Smooth Streaming
- Smooth Streaming URLs will not be available.
- Social Distribution
- It is not possible to select which audio track will be used for distribution. The track included in the video source (the muxed in audio) will be used, always.
- Ordering of audio tracks beyond the one "default" track
-
- You can pick a default audio track with CMS API per title by setting the
is_defaultfield totrue - There is also an account default, which can be set by Support
- This will only affect the "default" track in HLS manifests
- No other ordering is possible
- You can pick a default audio track with CMS API per title by setting the
- Ingesting more than one audio track from a single source
- We support one audio track from the source supplied in the source video.. Additional audio tracks must be ingested as separate audio files.
- DRM protection on videos that include only audio
- As soon as a video track is added, DRM protection will be enabled.
- End-user friendly labels
- We do not support custom labels for audio tracks. If you require that, you will need to make the change on the client side via the Player API.
- In some instances, switching tracks may cause the Brightcove Player to become unstable
-
- Track switching before all audio segments have been downloaded
- If the audio and video are different durations, the player will may stop whenever the shorter one runs out.
- Video "duration"
- The video
durationreported by the catalog/Playback API may be incorrect if the audio tracks have different durations. - Videos shared from other accounts
- Audio tracks cannot be added to videos shared from other accounts, as this involves re-transcoding. Audio tracks need to be added to the account the video was shared from.
- Safari
- Brightcove has seen cases where Safari will not always load ng the audio track marked as default. Due to Safari loading content natively, the language settings of the device will take priority when determining the audio track to load.
- Cloud Playout
- Cloud Playout doesn't support Multiple Audio Tracks.
- SSAI
- SSAI doesn't support Multiple Audio Tracks.
