Publishing Videos to Social Media Platforms
Brightcove Social allows you to easily publish videos in your account out to YouTube, Facebook and X (formerly Twitter). Before you can publish videos, you must create publishing destinations for the social accounts you wish to publish videos to. For information on creating publishing destinations, see Creating Social Media Publishing Destinations.
Note that using Auto Sync and manually publishing videos using the Social module are independent operations. Auto Sync is not aware of which videos have been manually published using the Social module. If a video is tagged in a way that causes Auto Sync to publish it to one of your social destinations, it will do that regardless if that video has previously been manually published using the Social module.
Determining the rendition to publish
In order to distribute videos to a social platform, videos should have at least one MP4 rendition or a video master available. Whichever asset is selected — an MP4 rendition or the video master — must also satisfy the receiving platform's file requirements (container format, bitrate, file size, frame dimensions, and duration); having a master available is not, on its own, a guarantee that the publish will succeed. Videos uploaded using one of the Brightcove provided, standard ingest profiles will save a master by default. For more information on archiving masters, see the Archiving Masters document.
When distributing videos to a social platform, Brightcove Social will attempt to distribute the highest quality rendition (based on bitrate) that meets the rules applied by the individual social platform. If the rendition sent to the social platform is rejected, there is no attempt to send another rendition.
The rules to rank videos are as follows:
- MP4 assets are better than any other video container. No attempt is made to order the other types of video containers.
- If the video containers are of equivalent quality, the video with the higher resolution (pixel width x height) is considered better.
- If the encoding rates are of equivalent quality, the video with the higher resolution (pixel width x height) is considered better. Note that because not all renditions of a video necessarily have the same aspect ratio, we compare videos based on a computed 'compound' proxy for the resolution by using the product of the height and the width of the respective videos.
Note that if one of the video assets is lacking any of the above information necessary to make the comparison, that video is considered 'worse' than the video that has all of the necessary information.
Publishing videos to social media
Once you have created publishing destinations, follow these steps to publish videos to social media.
- Open the Social module.
- From the Published page, click Publish. The Publish dialog will open displaying a list of videos in your account.
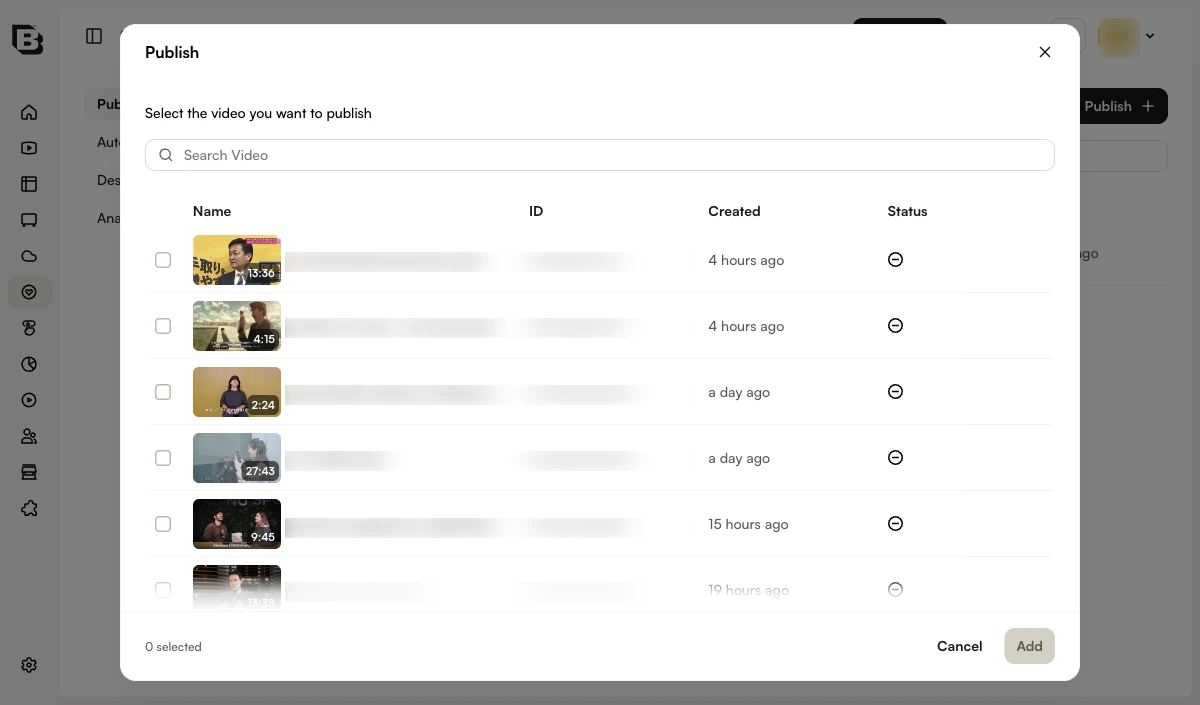
- Select a video and click Add.
- In Step 1 of the wizard, select the destination(s) to publish to and click Next.
- In Step 2, edit the post for each destination. You can navigate through your different destinations by clicking on the tabs.
- Click Next to review your changes.
- Click Publish to publish the video(s).
Setting video properties for YouTube
By default, videos that are up to 15 minutes long can be uploaded to YouTube. For information on uploading longer videos, see Enabling Longer Videos In YouTube. After a video is published to YouTube, any updates to the source video in Studio will not update on the YouTube side.
When choosing a YouTube destination, the following video properties can be configured:
Configuring the thumbnail source
When posting to YouTube, the video thumbnail source can be set to:
- YouTube - YouTube will select a thumbnail
- Video Cloud - Use the Video Cloud thumbnail image as the YouTube thumbnail
- Custom Image - Browse and select a custom thumbnail image to use
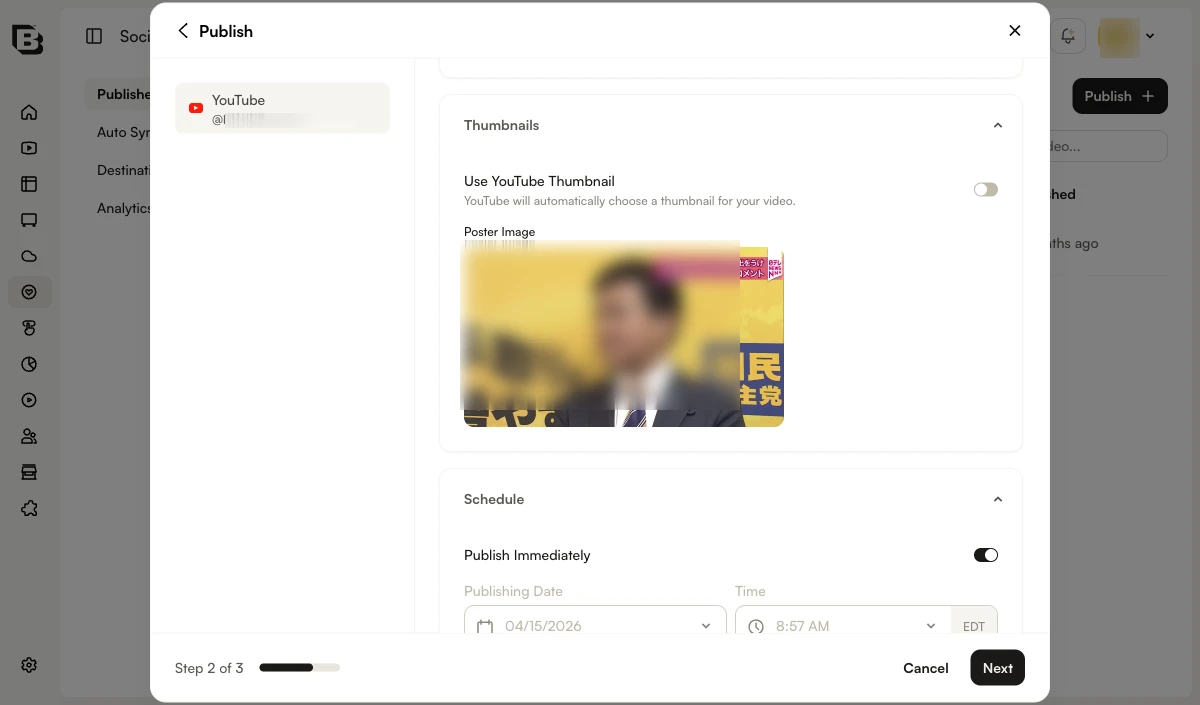
Checking Use for all destinations will use this thumbnail for all destinations currently being published to.
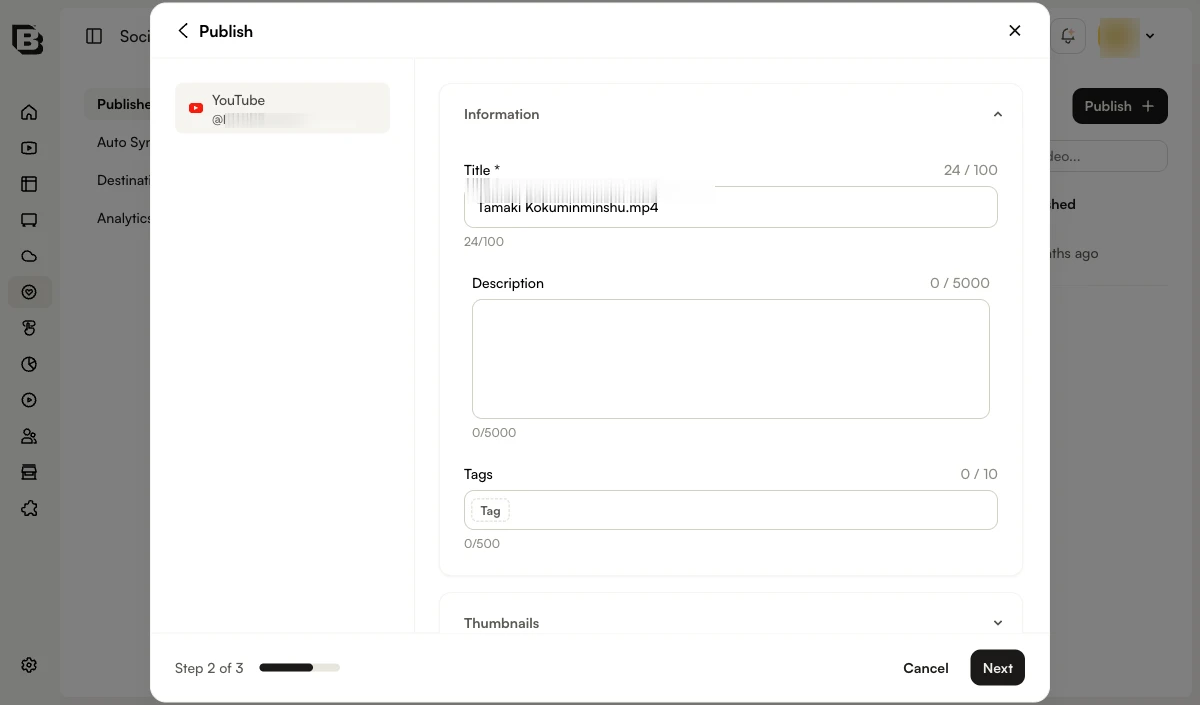
Configuring the Post Info properties
Click on the Post Info link. The following YouTube video properties can be set:
- Title - Title of the video (defaults to title). YouTube supports up to 100 characters.
- Description - Description of the video (defaults to long description). YouTube supports up to 5000 characters.
- YouTube Category - Content category for the video
- Tags - Tags for the video (defaults to tags). There's no specific tag count limit; you can use max 30 characters per tag, and the text field accepts up to 500 characters.
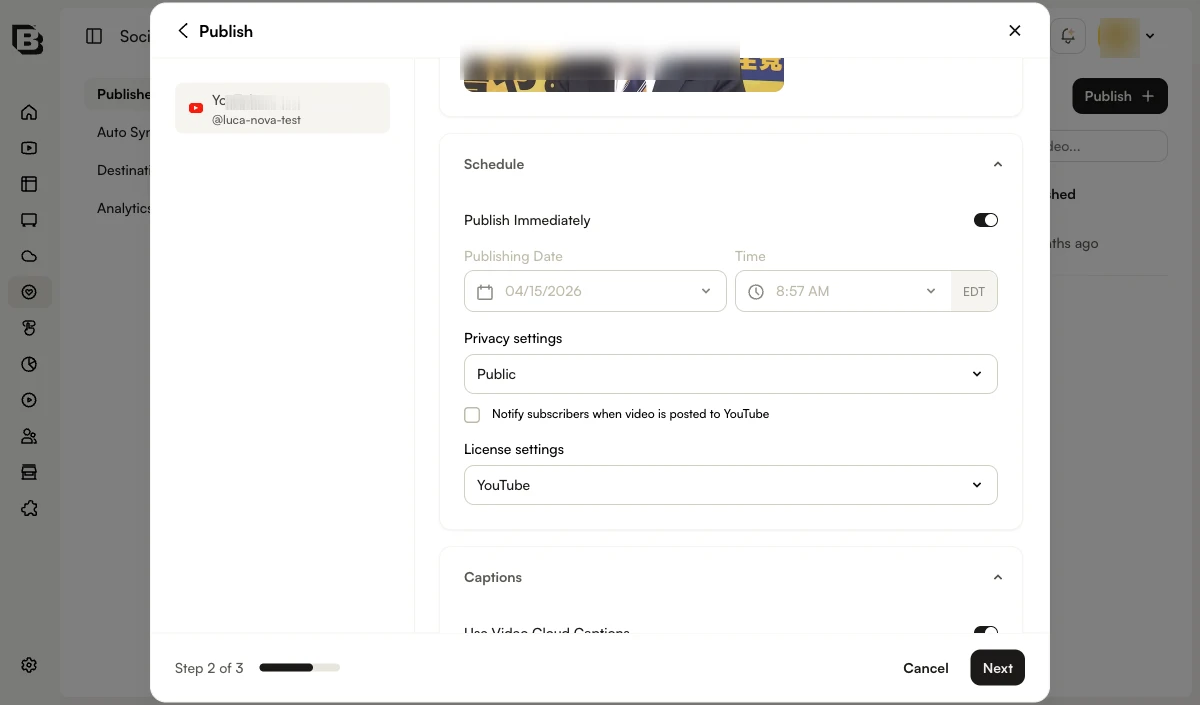
Configuring the Schedule properties
Click on the Schedule link and select a schedule setting:
- Publish Immediately - To publish the video immediately
- Schedule Publish Date - To choose a publish date and time for the video.
Configuring the Captions properties
Click on the Captions link. Select the source for the captions:
- Use Video Cloud captions - Uses the captions associated with the video. For information on working with captions, see Overview: Adding Captions to a Video.
- No captions - No captions will be sent to YouTube
- Upload captions - Click Upload captions and browse and select a captions file. The captions file should be in .VTT or .SRT format. Select the caption Language, add a Label and select the Format. Click Add Caption File.
Configuring the Visibility properties
In the Schedule accordion, select a Privacy settings option for the video. The following Privacy settings are available:
- Public - Anyone can view the video
- Unlisted - Anyone who has the link to the video can view it
- Private - Video can only be seen by you and the users you select
There is also a setting to Notify subscribers when video is posted to YouTube. If checked, your subscribers will see your videos in their Subscriptions feed and may receive a notification that the video was uploaded.
Configuring the License properties
In the Schedule accordion, select a License settings option for the video. The following settings are available:
- Standard YouTube License
- Creative Commons - Attribution
YouTube Shorts
YouTube short videos are bite-sized video clips for a maximum of 60 seconds. To set it up, follow these steps:
- Select a portrait-mode video 60 seconds or less
- Add the hashtag #Shorts to either the title or description
- Publish the video to the endpoint.
Setting video properties for Facebook
When choosing a Facebook destination, the following video properties can be configured:
After a video is published to Facebook, any updates to the source video in Studio will not update on the Facebook side.
Configuring the thumbnail source
When posting to Facebook, the video thumbnail source can be set to:
- Facebook - Facebook will select a thumbnail
- Video Cloud - Use the Video Cloud thumbnail image as the Facebook thumbnail
- Custom Image - Browse and select a custom thumbnail image to use
Checking Use for all destinations will use this thumbnail for all destinations currently being published to.
Configuring the Post Info properties
Click on the Post Info link. The following Facebook video properties can be set:
- Title - Title of the video (defaults to title). Facebook will truncate after 65 characters
- Status Message - Description of the video (defaults to short description). Note that Facebook has disabled their search API, therefore, it's not possible for us to auto complete a Facebook mention.
- Tags - Select a Facebook tag from the list. Note that Facebook manages the tags. The Social module must comply with them so Social checks the list when typing into the Tags field.
- Facebook Category - Content category for the video
Configuring the Schedule properties
Click on the Schedule link. Select Publish Immediately to publish the video immediately or select Schedule Publish Date and select a Publish Date & Time. You can also set that Posts Never Expire or select Schedule Expiration and then select a Expiration Date and Time. A Time Zone can also be selected.
Configuring the Captions properties
Click on the Captions link. Select the source for the captions:
- Use Video Cloud captions - Uses the captions associated with the video. For information on working with captions, see Overview: Adding Captions to a Video.
For captions Facebook requires a
language, which Social populates from thelanguageon the text track, and aname, which Social populates from thelabelon the text track.Be aware that the
namewill be visible to viewers in the Facebook player via the 'Setting' menu and the 'Closed Captions' menu. We recommend that text track labels be set to something that will be meaningful to viewers. (For example, Labeling captions in different languages in those languages.) - No captions - No captions will be sent to YouTube
- Upload captions - Click Upload captions and browse and select a captions file. The captions file should be in .VTT or .SRT format. Select the caption Language and Format. Click Add Caption File.
Configuring the Target properties
Click on the Target link to set where the video can be seen. The following options are available:
- Audience Optimization Interests - Add tags to describe the interests of people who are most likely to enjoy your post. For more information, see the Facebook documentation.
- Location Restrictions - Add countries to include or exclude from seeing the post
Configuring the Monetize properties
Click on the Monetize link. The following properties can be set:
- Who is your business partner for posts to this destination? - Add a business partner for branded content posts. As you type, a list of matching businesses will appear. For information on Facebook branded content, see the Facebook documentation.
- Allow business partner to boost posts
Configuring the Rights properties
Click on the Rights link. The following properties can be set:
- Detect Matching Content - Check to enable Facebook rights management. For information, see the Facebook documentation.
- Specify Ownership - Specify copyright ownership on video, audio, or both
- Country Selection - Select Worldwide, Include Countries or Exclude Countries. If include or exclude is selected, then add the Location Restrictions.
- Apply Match Rule - Select a rule. The Match Rule determines what automatic actions happen when people upload matched videos. Match Rules are managed inside of Facebook.
- Grant Permission - Authorize certain people or Pages or Instagram accounts to have permission to post videos matching your content.
Configuring the Distribution properties
Click on the Distribution link to set where the video can be seen. The following Custom Distribution and Moderation options are available:
- Show in News Feed - Shows video in News Feed
- Allow Embedding - Allow video embeds on third-party sites
- Add as Secret Video - Videos will be accessible only via a direct URL and are not searchable for people on Facebook
- Turn off Reactions, Comments and Shares - Disallows likes and comments
Configuring the Tracking properties
Click on the Tracking link to assign a universal ID to track the video across systems. The following Universal ID options are available:
- Leave Blank
- Use Video ID from Video Cloud
- Use Reference ID from Video Cloud, if present
Setting video properties for X (formerly Twitter)
When choosing an X destination, the following properties can be configured:
After a video is published to X, any updates to the source video in Studio will not update on X's side.
Configuring the Post Info properties
Click on the Post Info link and enter the Tweet content. Note that @mentions will be converted to #hashtags when being sent to X. For more information, see the blog post, Deprecation of X @mentions in Brightcove Social.
Setting video properties for LinkedIn
Videos that are up to 15 minutes long can be uploaded to LinkedIn. For information on LinkedIn video requirements, see the LinkedIn documentation.When choosing a LinkedIn destination, the following video properties can be configured:
Configuring the thumbnail source
When posting to LinkedIn, the video thumbnail source can be set to:
- Video Cloud - Use the Video Cloud thumbnail image as the YouTube thumbnail
- LinkedIn - LinkedIn will select a thumbnail
- Custom Image - Browse and select a custom thumbnail image to use
Checking Use for all destinations will use this thumbnail for all destinations currently being published to.
Configuring the Post Info properties
Click on the Post Info link. The following LinkedIn video properties can be set:
- Title - Title of the video (defaults to title). YouTube supports up to 100 characters.
- Description - Description of the video (defaults to short description). YouTube supports up to 5000 characters.
Configuring the Captions properties
Click on the Captions link. Select the source for the captions:
- Use Video Cloud captions - Uses the captions associated with the video. For information on working with captions, see Overview: Adding Captions to a Video.
- No captions - No captions will be sent to LinkedIn
- Upload captions - Click Upload captions and browse and select a captions file. The captions file should be in .VTT or .SRT format. Select the caption Language, add a Label and select the Format. Click Add Caption File.
Configuring the Visibility properties
Click on the Visibility link and select a visibility setting for the video. The following settings are available:
- PUBLIC - Anyone can view the video
- LOGGED IN - Anyone who is logged in can view the video
Setting video properties for Instagram
When choosing an Instagram destination, the following video details can be entered:
- Caption - Write a caption for the image, video, or carousel: maximum of 2200 characters, 30 hashtags, and 20 tags.
- Share to feed - Choose if you want your post to appear in the feed and reels tabs or only in the reels tab.
- Comments - Comments can be hidden or shown on the post.
Creating a post for Pinterest
When choosing a Pinterest destination, the following video details can be entered:
- Pin's title- Write the name of your pin. Maximum of 100 characters.
- Description- Describe what your video is about.
- Boards- Choose which board you want to publish your video. You must have at least one board created.
- Destination link- Pinterest destination link
Creating a clip
Brightcove Social provides the ability to create video clips from existing videos in your account. Clips can be used as short, teaser videos that can be posted to social media. To create a clip, click Create Clip. For information on creating a clip, see Creating a Video Clip Using Brightcove Social.
Downloading videos
Brightcove Social provides the ability to copy the video URL or download a video source file. When downloading, the highest quality MP4 rendition will be downloaded. If there are no MP4 renditions, the Download link will be disabled.
It is important to understand that URLs for renditions and images are not fixed. Brightcove reconfigures the storage of media assets from time to time and when this happens, URLs for specific assets will change. If you are relying on hard-coded URLs to these assets, the links may break at some point. The best way to prevent links to media from breaking is to retrieve them from at runtime using the CMS API.
Follow these steps to download a video.
- Open the Social Module.
- From the Published page, click on the video to download and then click Download.
- Copy the video URL or click the link to open the video in your browser. Right click the video to save the source file locally.
- Click Close.
The intention of the download link is to allow you to download the file or to use the URL as a value that can be provided to a social platform’s uploader module (for platforms that support upload from an URL). The URL is not intended to be a long-lived, publicly-accessible URL that you would paste into a public social platform post.
Viewing videos in the Media module
Videos on the Videos page can be viewed in the Media module by clicking on a video and then clicking View in Media.
Viewing the published locations
Videos that have been attempted to be published to social media will display Check Status in the Status column.
Clicking the Check Status link will display a list of social destinations that the video was published to and the status of the publish.
Publishing 360° videos
Both YouTube, Facebook and the Brightcove Player support 360° video playback. When a 360° video is published to YouTube or Facebook using Brightcove Social, the video will playback in 360° mode. Note that there may be a delay while the 360° effect is processing. Before uploading 360° videos to , there are some things you must do. For information on working with 360° videos, see Working with 360° Videos. Once your video has been uploaded, the process to publish 360° videos is the same as regular videos.