Adding Captions to Videos using the Media Module
The text tracks properties can be configured to provide captions for a video. Captions provide additional or interpretive information to individuals who wish to access it. Captions are necessary so the deaf and hard of hearing can access the audio portion of video presentations. To display captions for a video in the Brightcove player, you need to complete the following tasks:
Creating caption files
To add captions to a video, you first need to create a captions file. One option is to use Video Cloud Studio to generate captions for videos. The Brightcove Player supports Web Video Text Tracks Format (WebVTT), SRT, DFXP and SCC formats, although all non-WebVTT formats are converted to WebVTT as part of the Dynamic Delivery ingestion process. The WebVTT file format (shown below) is plain text and contains time text data followed by the desired caption or subtitle text.
WEBVTT
00:00:00.000 --> 00:00:07.080 align:middle line:90%

00:00:07.080 --> 00:00:10.280 align:middle line:84%
Hi, I'm Bob Bailey, a Learning
Specialist with Brightcove.

00:00:10.280 --> 00:00:12.780 align:middle line:84%
In this video, you'll learn
about how Video Cloud Studio is

00:00:12.780 --> 00:00:14.940 align:middle line:84%
organized and get a
brief overview of what

00:00:14.940 --> 00:00:17.490 align:middle line:90%
you can accomplish using it.
For more information on the WebVTT format, see this link. You should have a separate caption file for each language you need to support. While there are many third-party tools to help create captions files, Brightcove has several partners that provide transcription, captioning and translation services. For a complete list of Brightcove partners, visit the Partners section of our website.
Configuring the text track properties
Once the caption files have been created, they can be uploaded and hosted by Brightcove or reside at an internet accessible URL.
To view and edit the text track properties for a video, open the Media module , click the video title link and locate the Text Tracks section.
To configure the text track properties, follow these steps:
- Open the Media module.
- Click the video title link.
- Click Edit or double-click in the Text Tracks section.
- Select if the text track file will be uploaded to or hosted on an external URL.
- File Upload - Click Browse and select the text track file from the file system. The file will be uploaded to .
- URL Upload - Enter the public URL where the text track file resides and then click Upload. The file will be uploaded to .
- Remote URL - Enter the public URL where the text track file resides. The URL must be less than 250 characters. Captions will be loaded from the remote URL.
- Auto caption - Select this option to have caption files generated for the video.
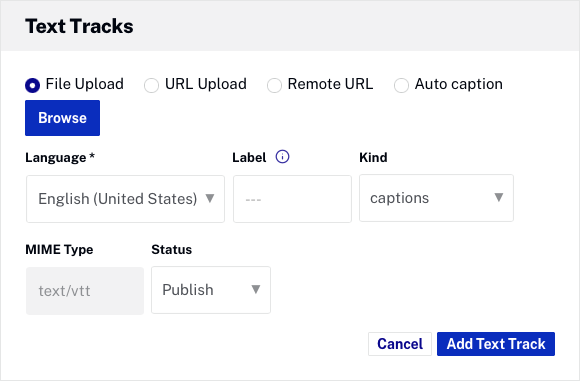
- Select the Language of the track text data.
- Enter the appropriate Label for the caption file. The label is displayed inside player and allows the viewer to select a language. If no label is supplied, the value specified for language is displayed.
- Select the Kind of text track. Options include:
- Captions - Similar to subtitles, but may also include sound effects and other audio information
- Subtitles - The transcription or translation of the dialogue
- Descriptions - Intended to be a separate text file that describes the video through a screen reader
- Chapters - Intended to help the user navigate through the video
- Metadata - Information and content about the video which isn’t intended to be displayed to the viewer by default (though you may wish to do so using JavaScript)
- Select a Status:
- Publish - Text track will appear in players
- Draft - Text track will not appear in players
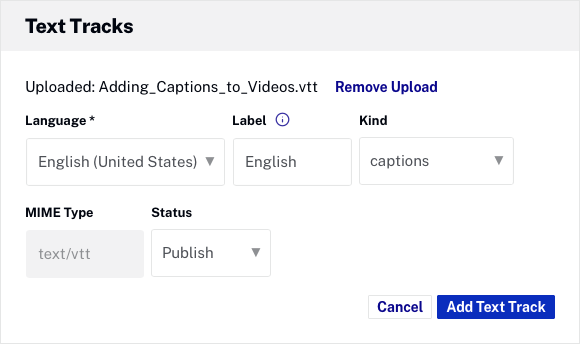
- Click Add Text Track to save the text track information.

- Click Add Text Track to add another text track or Save to save the text tracks.
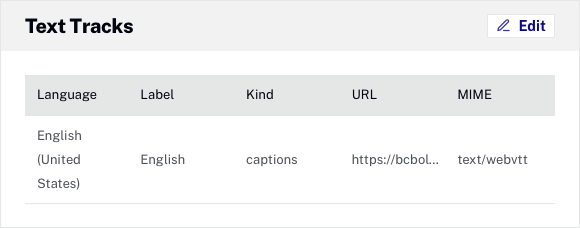
If any text tracks have been designated as the default, they will appear in bold. To delete a text track, click the delete icon (![]() ) next to the text track.
) next to the text track.
When a player with associated captions is published, a CC button will appear on the player chrome. Click the CC button to select a caption language and display the captions.

Edit caption properties
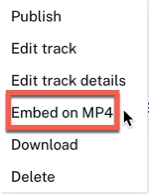
To edit the properties of existing captions, click  in the Text Tracks panel, and select the Edit track on the captions item that you want to edit:
Embed on MP4
To embed your captions in an MP4 video rendition, click the three-dot menu ( ) next to the track and select Embed on MP4. A confirmation dialog opens; click Embed to continue.
Downloading caption files
The Media module provides the ability to download caption files. To download a caption file, follow these steps.
- Open the Media module.
- Click the link for the video you want to edit.
- Locate the Text Tracks section and Edit.
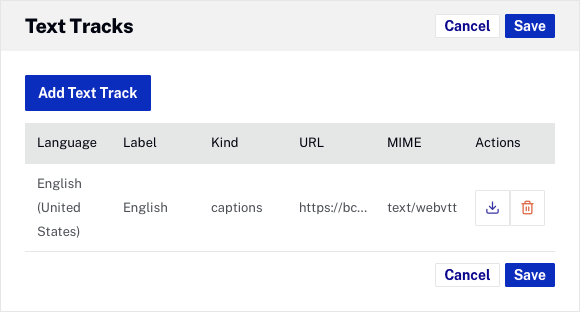
- Click the download icon (
 ) in the Actions column to download the caption file.
Styling captions
The default look and feel of the captions is subject to change so you may wish to style the captions. For information on styling captions, see Styling Captions.
Limitations
- Captions are supported on the following device types and operating systems.
- iOS 10+
- Android 7+
- Microsoft Edge
- The latest Chrome, Safari, and Firefox browsers on desktops
- There is no technical limit to the length of a caption, but in order for the full caption to be visible, the player must be large enough to display that much text
- The player recognizes all Text Tracks contained within a content manifest as
subtitles. So those created in the Media Module with kind:captionsand delivered in-manifest will be reported by the player as having kind:subtitles. - Because Safari and Chrome mobile use the native browser capabilities for styling captions, the Captions Settings menu option is not available in the CC menu on these browsers.
- If you ingest an invalid WebVTT file in Studio, the file will "process", but will not be added to the video. Workaround: you can validate your WebVTT files using this online validator.
- Currently, ingesting text tracks from Google Drive links is not possible.