Increasing the Quality of Poster and Thumbnail Images
When a video is uploaded to Video Cloud, poster and thumbnail images are created automatically by taking a snapshot from the source video at the midway point. The size of the poster and thumbnail is based upon the dimensions specified in the ingest profile used when uploading the video.
Poster and thumbnail images can be seen in the following areas:
- In the Media module, the thumbnail image is displayed next to the video; the poster image will appear in the preview player on the video details page
- The thumbnail image will appear when publishing a playlist
- The poster image is displayed in the playback area of the video player after the player loads; the poster will display until the viewer presses the play button
Depending on the size of your published player, the poster image may be upscaled to fit the player. Scaling images may make them appear blurry and distorted. Having poster images that are a larger size will eliminate the need for upscaling images.
Checking image sizes
There are a couple of ways that you can check the size of a poster image:
Checking image sizes in the Media module
To check the size of the poster and thumbnail images in the Media module, follow these steps:
- Open the Media module.
- Click a video title to open the video details page.
- On the Overview tab, expand the Thumbnails accordion and hover over the poster or thumbnail image.
- Click the expand icon (
 ) to open a larger preview of the image.
You may wish to use one of the many tools available that can give you the exact dimensions of the image. Remember, if any of your players are larger than the size of the poster, the image will be upscaled.
Checking ingest profile image sizes
Video Cloud Studio does not display the ingest profile that was used when a video was uploaded. You can, however, check the image sizes for ingest profiles:
- Open the Admin module from the left navigation. Note that you must be a Video Cloud Studio user with the Administrator role to access the Admin module.
- Click Ingest Profiles.
- Click on a Profile Name. The Profile Editor will display the profile definition.
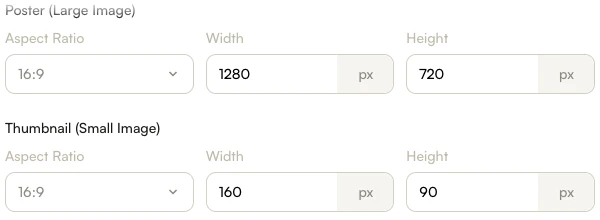
For Dynamic Delivery and Context-Aware profiles, image sizes are listed in the Poster (Large Image) and Thumbnail (Small Image) sections of the Basic Editor. The following example is from a Dynamic Delivery Profile Version.
- Check the poster and image sizes. Remember, if any of your players are larger than the size of the poster, the image will be upscaled.
Creating a custom ingest profile
In order to change the image sizes, you should create a custom ingest profile and set the sizes to the appropriate values. For information on creating custom ingest profiles, see Managing Ingest Profiles.
Once a new ingest profile (or profiles) has been created, that profile should be used when uploading videos.
Automatic resizing
When you add custom poster and/or thumbnail images via Studio or the Dynamic Ingest API, by default Video Cloud will resize these to match the image sizes defined in the default ingest profile for the account.
What about my existing videos?
What is the best way to fix the image sizes on existing videos? There are two options:
Retranscoding existing videos
Retranscoding an existing video will generate new poster and thumbnail images. The video should be retranscoded using an ingest profile that has larger image sizes. For information on retranscoding existing videos, see Retranscoding Videos using the Media Module.
Uploading a new poster image
A new, properly sized poster image can be uploaded using the Media module. When a new poster image is uploaded, the image will be transcoded using the default ingest profile for the account. You should ensure that the default ingest profile has the video thumbnail image sized appropriately.
To view the default ingest profile, when viewing the list of ingest profiles, look for the one marked with the  indicator.