Creating and Managing NextGen Live Events
Introduction
NextGen Live is Brightcove's next-generation live streaming solution that provides improved reliability, consistency, and scalability. The NextGen Live module can be used to broadcast live events to both desktop and mobile devices with enhanced features and better performance than Legacy Live.
After entering your event information into NextGen Live, you will be provided with streaming endpoint URL that you configure in your encoder.
NextGen Live supports two types of streaming configurations:
- Event Channels - Created for shorter-length, one-time, or recurring events
- Linear Channels - Used for delivering 24/7 live content
Prerequisites
Before you can broadcast a NextGen Live event, the following items are required:
- A Brightcove account with access to NextGen Live
- A video source to broadcast the event
- Encoding software (e.g., Telestream Wirecast, Open Broadcaster Software, or hardware encoders)
- Stable internet connection with sufficient upload bandwidth
Limitations
- Live broadcasts will experience a 15-30 second delay (can be reduced to 5-10 seconds with low latency mode)
- Streaming must begin within 30 minutes of starting the channel (default account setting)
- Some output settings cannot be modified after the channel has been created (use the Edit function to modify configurable options or modify JSON directly)
- Brightcove scales live streaming capacity dynamically, but creating several channels in a region simultaneously may cause short delays
Billable States
Billing for NextGen Live channels applies to active states:
Active States (billing applies)
- waiting - Channel is active and waiting for encoder connection
- connected - Encoder is connected and channel is actively streaming
- disconnected - Encoder disconnected but channel remains active within reconnect time
Inactive States (billing does not apply)
- configuring - Channel is being configured and is not active
- off - Processing state is off and channel is not active
- starting - Channel is starting and is not active
- stopping - Channel is stopping and is not active
- error - Channel encountered an error and is not active
- finishing - Channel is in the process of finishing streaming and is not active
- finished - Channel has finished streaming and has been archived
Managing NextGen Live Channels
To access the Live module, log in to Video Cloud Studio and click Live in the left navigation. The Channels page displays all your NextGen Live channels organized into four tabs:
- All - Displays all channels regardless of state
- Live - Channels that are currently streaming
- Standby - Channels that are ready but not actively streaming
- Archived - Channels that have been archived
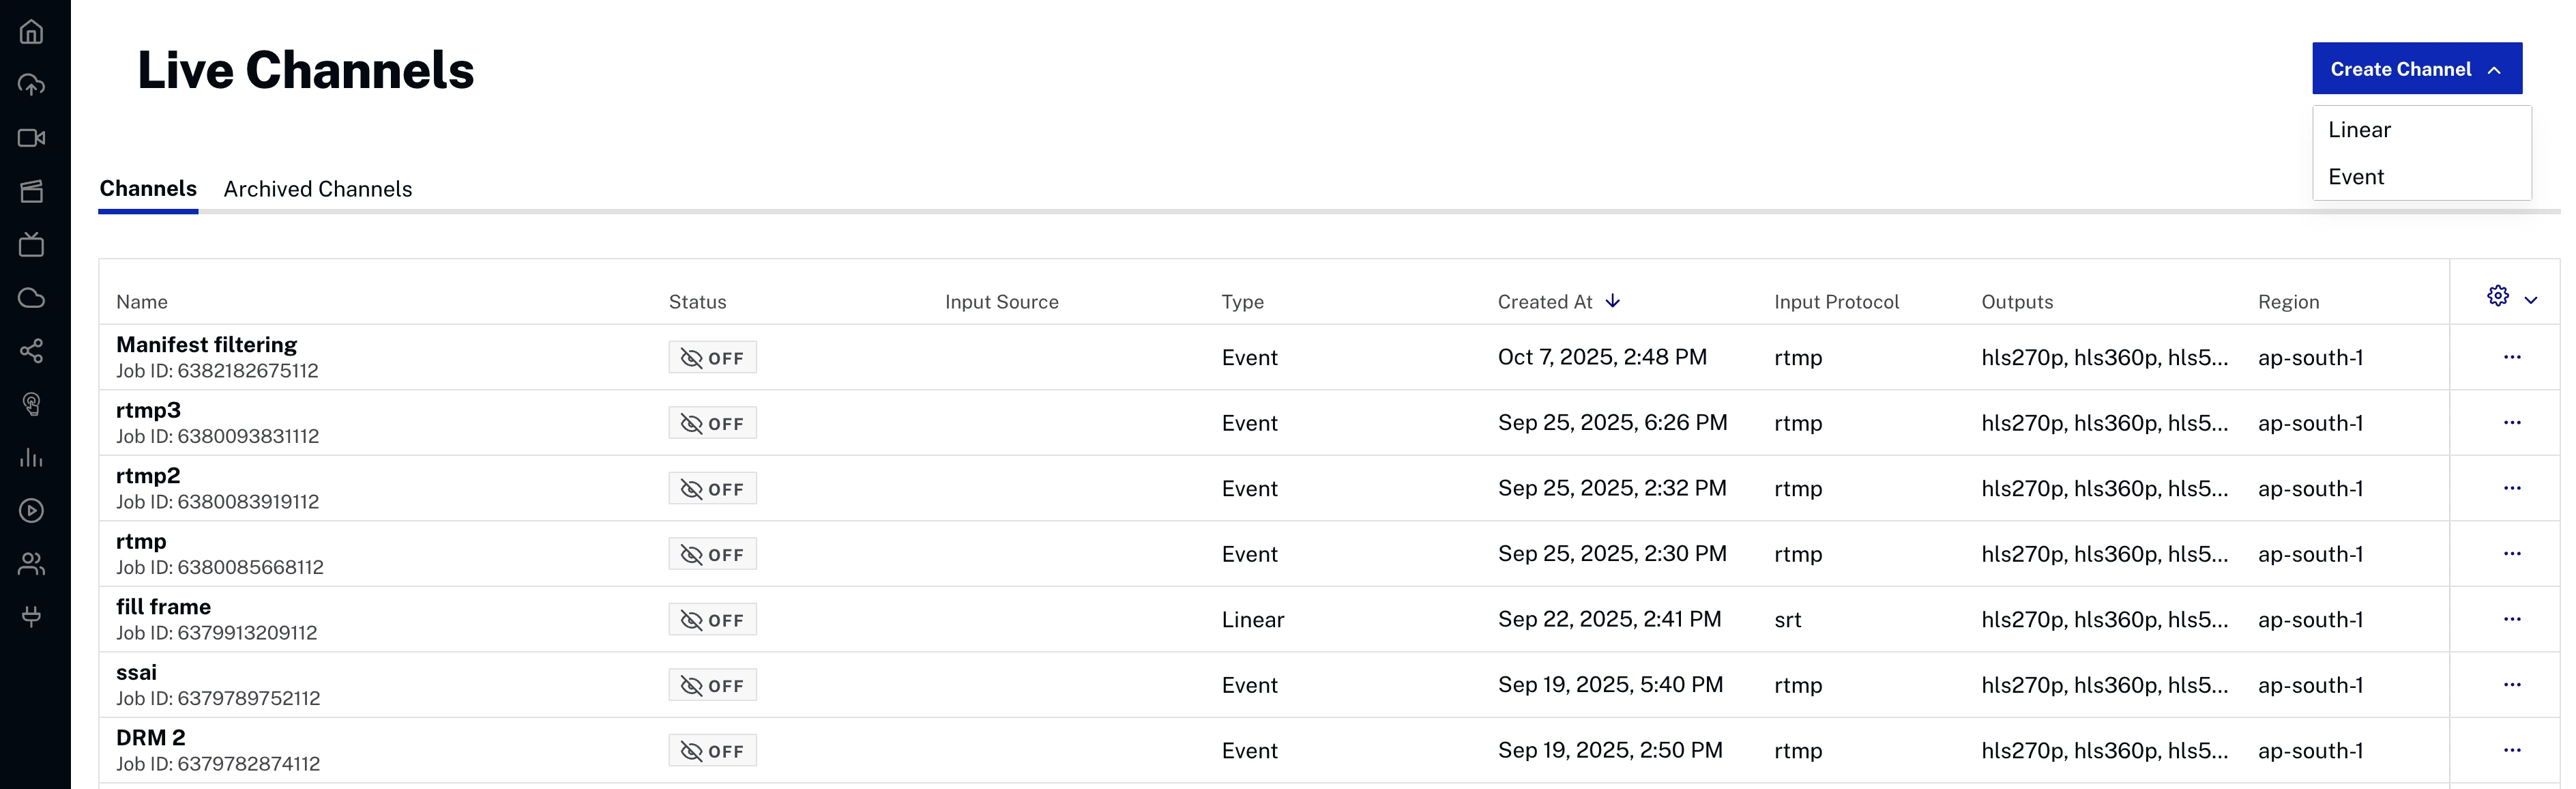
Each channel displays the following information:
- Name - Channel name with thumbnail
- ID - Unique channel identifier
- Status - Current operational state of the channel (e.g., Off, On, Error)
- Input Source - Whether or not the encoder is connected (e.g., Disconnected, Connected)
- Type - Channel type (Event or Linear)
- Created At - Date and time when the channel was created
- Input Protocol - Protocol used for the input stream (e.g., RTMP, SRT, RTP)
- Outputs - Output formats and resolutions generated by the channel (e.g., hls270p, hls360p, hls540p)
- Region - The geographical region where the channel is hosted (e.g., us-west-2)
You can search for channels using the search bar, and sort results using the Created Date sort button.
Channel Actions
Click a channel row to open the Control Room. From the Control Room header, you can start or stop the channel, open the Embed on Web dialog, open the Create Clips dialog, and access the three-dot menu (⋮) for additional actions (Edit JSON, Copy Channel ID, Archive). See Control Room for details.
Creating a New NextGen Live Event
For complete step-by-step guides to creating and streaming NextGen Live events, see:
- Step-by-Step: Using NextGen Live with Open Broadcaster Software (OBS)
- Quick Start from Legacy Live to NextGen Live
To create a new NextGen Live channel, click New Channel at the top right of the Channels page. A 3-step wizard will guide you through the setup.
Step 1: Choose Channel Type
Select the type of channel to create:
- Event Channel - A single live broadcast with a clear start and end time, ideal for one-time events like webinars, sports, or concerts
- Linear Channel - A 24/7 always-on live stream designed for continuous, scheduled programming without a defined end
Click Next to continue.
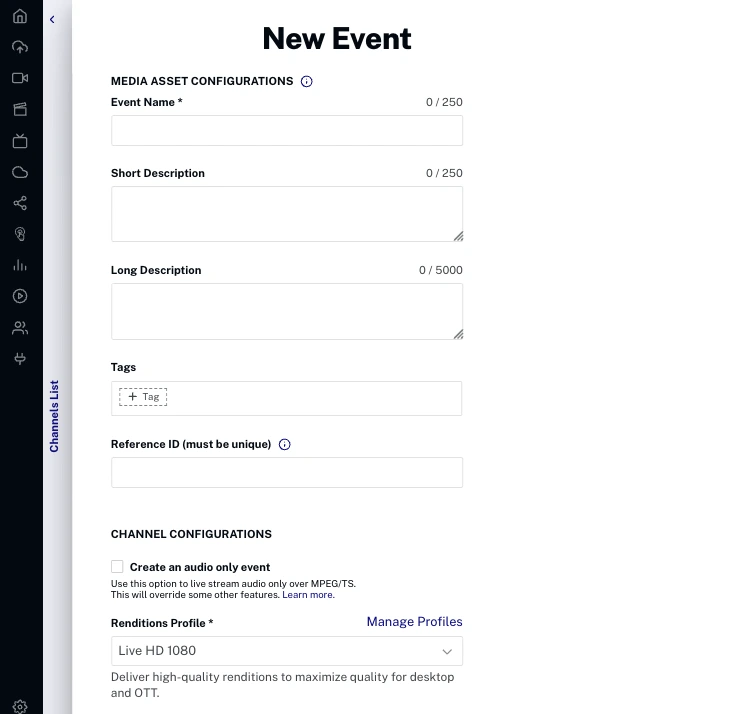
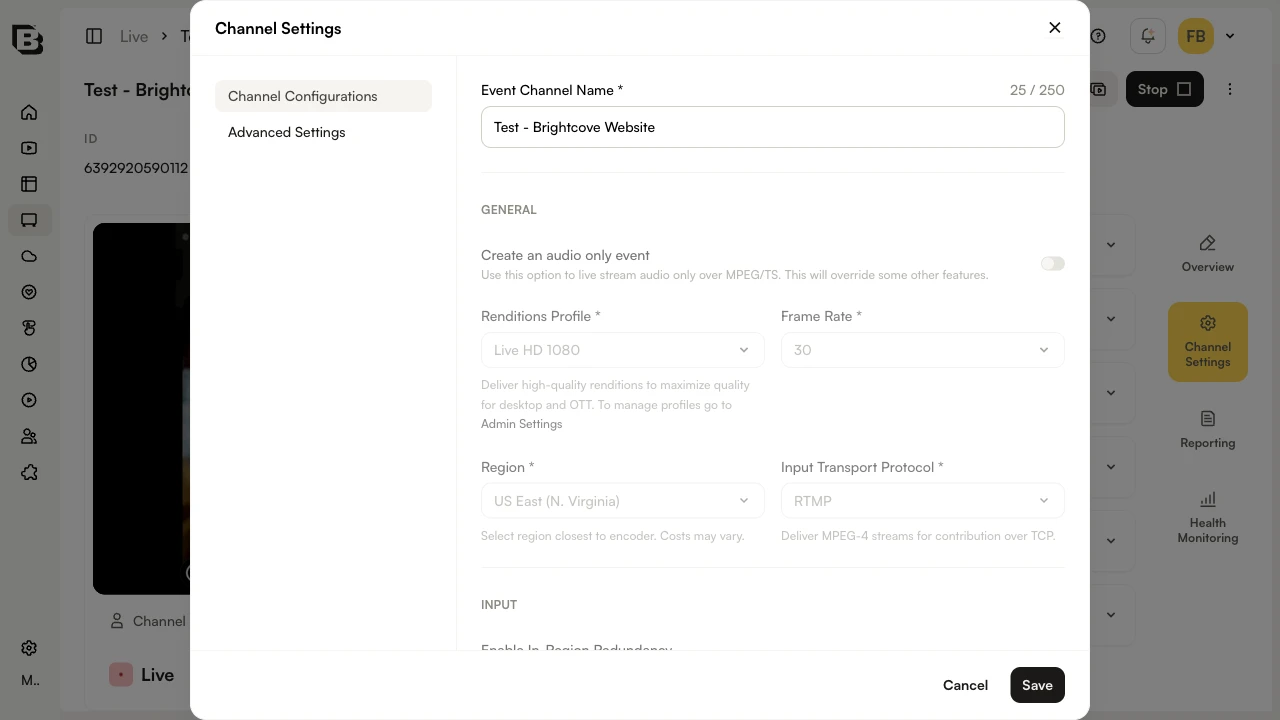
Step 2: Channel Configurations
Configure the core settings for your channel:
- Event Channel Name - Name for the channel (required, max 250 characters). This name will also appear in the Media module if a live media asset is created.
General
- Create an audio only event - Toggle to live stream audio only over MPEG/TS. This will override some other features.
- Renditions Profile - Controls the quality and number of live renditions (e.g., Live HD 1080). To manage profiles, go to Admin Settings.
- Frame Rate - Select frame rate (e.g., 30 fps)
- Region - Select the region closest to your encoder location (required). The following regions are supported:
- US East (N. Virginia)
- US West (Oregon)
- Asia Pacific (Tokyo)
- Asia Pacific (Seoul)
- Asia Pacific (Singapore)
- Asia Pacific (Sydney)
- Asia Pacific (Mumbai)
- Europe (Frankfurt)
- Europe (Ireland)
- Input Transport Protocol - Select the protocol for the input stream (required, e.g., SRT, RTMP, RTP)
Input
- Enable In-Region Redundancy - Adds a backup ingest path in the same region to ensure seamless failover if one input fails
- SRT Input Passphrase - Enter a passphrase for secure input (only displayed if SRT is selected as the input protocol)
VOD
- Convert media asset from Live to VOD when complete - Once the live event channel is stopped, the associated media asset will be updated to use the VOD content captured from the event. The channel will then be archived, and it can be accessed through the Media module.
Renditions
A preview of the Video Renditions and Audio Renditions that will be created based on the selected renditions profile is displayed at the bottom of this step.
Click Next to continue.
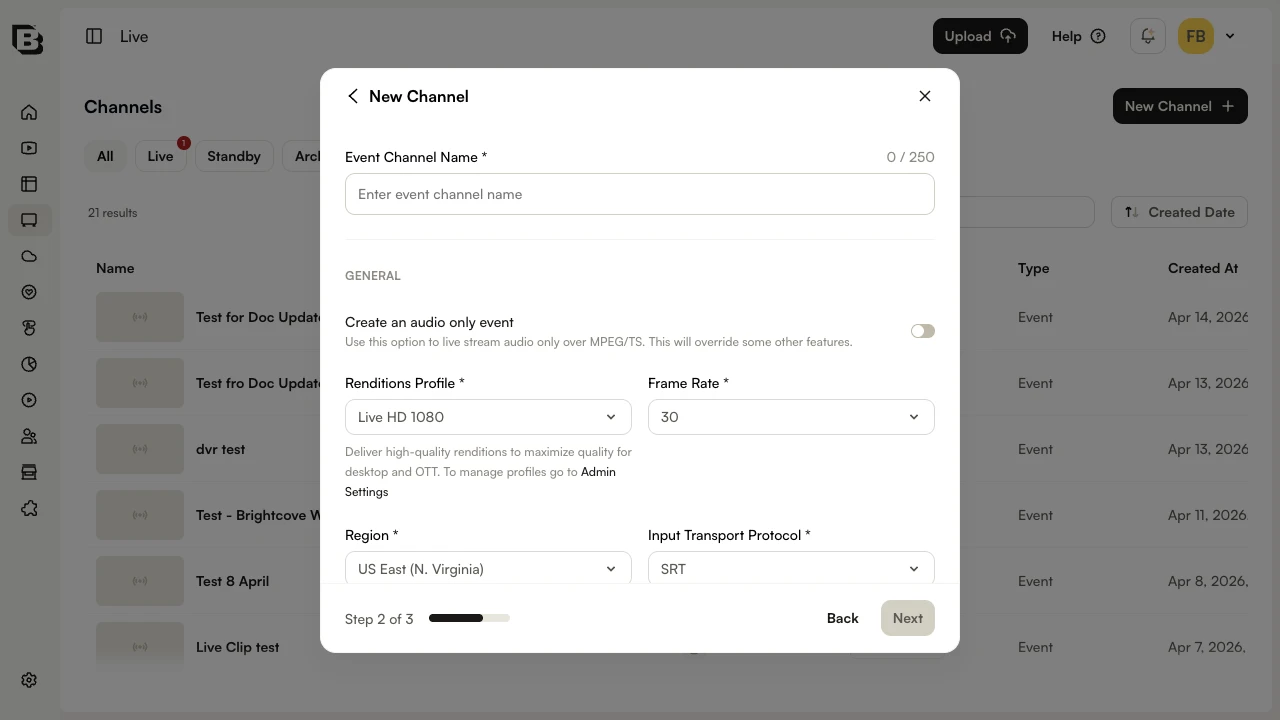
Step 3: Advanced Settings
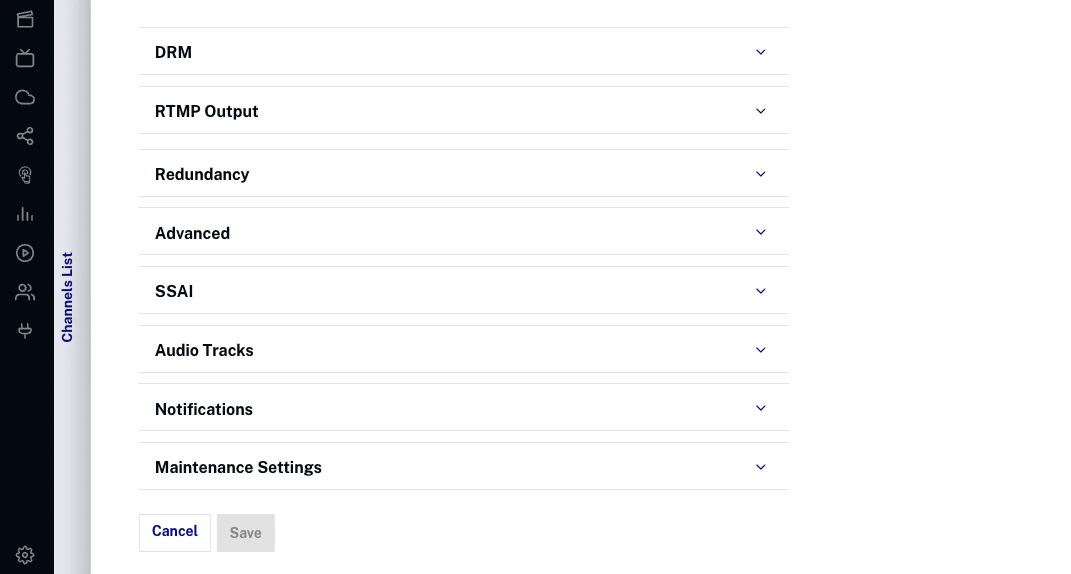
Configure optional advanced settings using the expandable accordion sections:
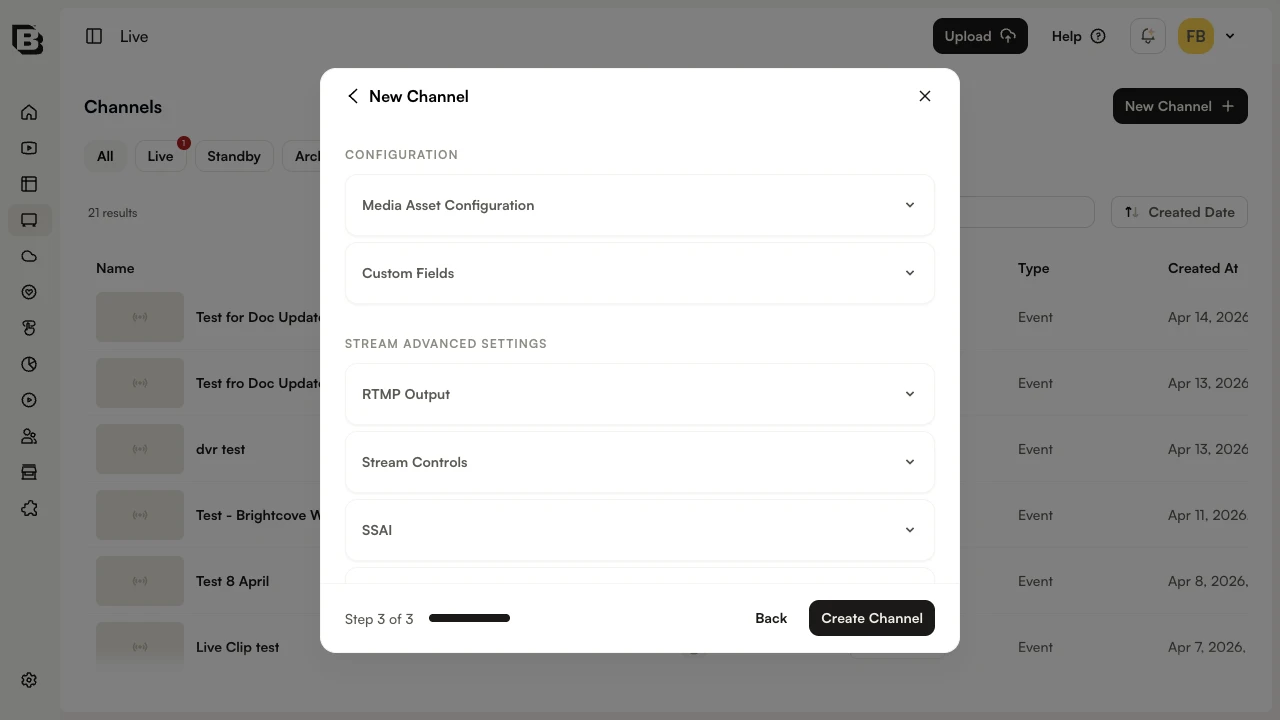
Configuration
- Media Asset Configuration - Configure metadata for the live media asset that will be created in the Media module:
- Tags - Tags to associate with the media asset
- Short Description - Brief description (max 250 characters)
- Long Description - Detailed description (max 5000 characters)
- Reference ID - Unique reference ID for the media asset
- Custom Fields - Assign values to any required custom fields configured for the account
Stream Advanced Settings
- RTMP Output - Delivers a live stream to external RTMP destinations simultaneously with Brightcove playback. Click Add RTMP to configure.
- Stream Controls - Configure stream behavior:
- SCTE 35 Passthrough - Keep ad break markers from the original feed in your live stream
- Low Latency (LL-HLS) - Use the Low-Latency HLS protocol to deliver with end-to-end latency of ~5-10 seconds
- Ingest IP Whitelist - Restrict input to specific IP addresses for security
- Caption Languages - Configure supported caption languages
- DVR Window - Allow viewers to rewind the live stream for a set amount of time. Set the DVR Time in seconds when enabled.
- SSAI - Enable server-side ad insertion to insert ads directly into the video stream for seamless playback on all devices
- Audio Tracks - Supports multiple audio tracks per stream, enabling multilingual or descriptive audio experiences. Click Add Audio Track to configure.
- Notifications - Sends real-time webhooks to a configured URL about live job events like start, stop, or errors. Click Add Notification to configure.
- Maintenance Settings - Select the day of the week and time for a 2-hour maintenance window
Click Create Channel to create the channel. The Control Room will open with details about your channel.
To start streaming, click Start in the Control Room header. The encoder must be started within 30 minutes of when the channel is started.
Configuring Advanced Options
NextGen Live provides advanced configuration options that can be set during channel creation (Step 3) or modified after creation through the Channel Settings modal. The advanced options are organized into accordion sections.
Digital Rights Management (DRM)
Configure DRM encryption for your live stream:
- Enable All Encryptions - Enable all available DRM encryptions
- Widevine - Google Widevine DRM encryption
- FairPlay - Apple FairPlay DRM encryption
- PlayReady - Microsoft PlayReady DRM encryption
- License Key Protection - Additional license key protection (may require account enablement)
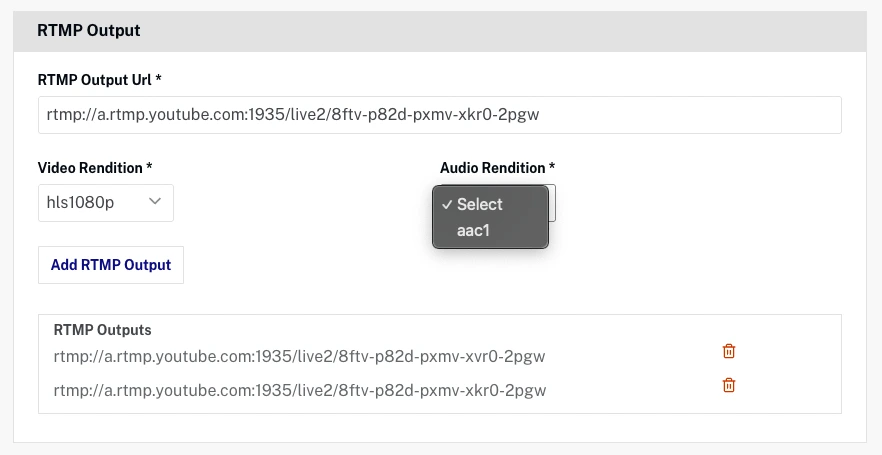
RTMP Output
Delivers a live stream to external RTMP destinations simultaneously with Brightcove playback. Click Add RTMP to configure an output:
- RTMP Output URL - Destination URL for RTMP output (required)
- Video Rendition - Select video quality for RTMP output (required)
- Audio Rendition - Select audio quality for RTMP output (required)
Stream Controls
Configure stream behavior and advanced streaming features:
- SCTE 35 Passthrough - Keep ad break markers from the original feed in your live stream
- Low Latency (LL-HLS) - Use the Low-Latency HLS protocol to deliver with end-to-end latency of ~5-10 seconds
- Ingest IP Whitelist - Restrict input to specific IP addresses for security
- Caption Languages - Configure supported caption languages
- DVR Window - Allow viewers to rewind the live stream for a set amount of time. Set the DVR Time in seconds when enabled (maximum 28,800 seconds/8 hours).
Captions
NextGen Live supports closed captions with enhanced compatibility across platforms:
Supported Caption Formats
- EIA-608 - Standard closed caption format
- EIA-708 - Digital television closed caption format
Caption Configuration
Configure caption languages for maximum compatibility:
- Caption Languages - Specify up to 4 caption languages using 3-letter ISO 639-2 codes
- Embedded Captions - Captions embedded in the input stream will be passed through by default
- Android Compatibility - Language codes are essential for Android devices to properly display captions
Caption Language Examples
Common language codes for captions:
- eng - English
- spa - Spanish
- fra - French
API Configuration
When creating a NextGen Live channel via API, configure captions in the job payload:
{
  "outputs": {
    "caption": [
      {
        "type": "embedded_closed_caption",
        "passthrough": true,
        "language_code": "eng"
      },
      {
        "type": "embedded_closed_caption",
        "passthrough": true,
        "language_code": "spa"
      }
    ]
  }
}
This example configures two caption languages (English and Spanish) that will be passed through from the input stream with proper language identification.
Server-Side Ad Insertion (SSAI)
Configure SSAI for ad insertion into live streams:
- Enable SSAI - Enable server-side ad insertion
- Select Slate Asset - Choose slate asset for ad breaks
Audio Tracks
Configure multiple audio tracks for your live stream:
- Language Code - ISO language code for the audio track (required)
- PID - Program identifier for the audio track (required)
- Label - Display label for the audio track (required)
Notifications
Configure event notifications:
- Subscription Type - Select notification type (State Change, Error)
- URL - Webhook URL to receive notifications (required)
Maintenance Settings
Configure maintenance windows for your channel:
- Day of the Week - Select the day for the 2-hour maintenance window
- Start Time - Set the start time in UTC for the maintenance window
- End Time - Automatically calculated as 2 hours after start time
Maintenance Best Practices
For 24x7 channels, consider the following to minimize any potential viewer impact:
- Choose a low-traffic window - When creating the channel, set the maintenance window during your lowest-traffic period of the week.
- Enable redundancy - With redundancy active, only one ingest path is affected during maintenance while the other keeps streaming, so playback stays uninterrupted.
- Stop and restart the channel - When maintenance is needed, it is typically scheduled at least one week in advance. Restarting the channel at a convenient time within the week before your next window (for example, ahead of a major event) keeps you clear of any maintenance activity for that period.
Editing NextGen Live Channels
After creating a NextGen Live channel, you can edit certain configuration options through the Channel Edit page. However, not all fields can be modified after creation.
Fields That Cannot Be Edited
The following fields are immutable and cannot be changed after channel creation:
Core Infrastructure
- Region - Geographic region where the channel is hosted
- Channel Type - Event or Linear channel type
- Account ID - Associated Brightcove account
- Channel ID - Unique channel identifier
- Created At - Channel creation timestamp
- Ingest Endpoints - Input streaming endpoints
Manifest Configuration
- Segment Duration - Duration of video segments
- Segment Container Format - Container format (CMAF, etc.)
- Playlist Window - DVR window duration
- Low Latency Settings - LL-HLS configuration
- HLS/DASH Settings - Output format configurations
Input Configuration Restrictions
- Fixed Ingest IP - Cannot be changed if enabled
- Input Protocol - Cannot be changed if fixed IP is enabled
Output Restrictions (Existing Outputs)
- Video Codec - Cannot change codec for existing outputs
- Keyframe Rate - Cannot modify keyframe settings
- Frame Rate - Can only change to multiples of original
- Audio Codec - Cannot change codec for existing outputs
- Sample Rate - Cannot modify audio sample rate
Advanced Features
- DRM Settings - Cannot disable DRM once enabled on a channel (must create a new channel without DRM)
- Redundancy Configuration - Cannot add/remove redundancy
- SSAI Settings - Server-side ad insertion configuration
Fields That Can Be Edited
The following fields can be modified after channel creation:
Input Configuration
- Protocol Settings - Input protocol configuration (unless fixed IP enabled)
- IP Whitelist - CIDR blocks for input restriction
- Reconnect Time - Encoder reconnection timeout
- Audio PIDs - Audio program identifiers
- SRT Options - SRT-specific configuration
Output Configuration
- New Video Outputs - Can add new video renditions
- Video Bitrate - Can modify bitrate for existing outputs
- Resolution - Can change width/height
- Codec Options - Can modify encoder settings
- New Audio Outputs - Can add new audio tracks
- Audio Bitrate - Can modify audio bitrate
- Language Codes - Can change audio language settings
External Outputs
- RTMP Outputs - Can add/modify/remove RTMP destinations
- Caption Outputs - Can modify caption configuration
Advanced Settings
- Encryption - Can enable DRM if not already enabled and modify DRM settings, but cannot disable DRM once enabled
- Notifications - Can modify webhook settings
- Maintenance Windows - Can change maintenance schedule
- Audio Only Mode - Can toggle audio-only streaming
- Live to VOD - Can modify VOD conversion settings
Editing Process
To edit a NextGen Live channel, you have three options:
Option 1: Edit from Live Module Channels Page
- Ensure the channel is in the "Off" state
- From the Live Module channels page, click the ellipsis (...) menu for the channel
- Select Edit JSON from the dropdown menu
- Modify the JSON configuration directly
- Click Save to apply changes
Option 2: Edit from Control Room
- Ensure the channel is in the "Off" state
- Click on the channel name to open the Control Room
- Click the Channel Settings tab in the right sidebar
- In the Channel Settings modal, use the Channel Configurations or Advanced Settings sub-sections to modify the available options
- Click Save to apply changes
Option 3: Edit via API
You can also update NextGen Live channels programmatically using the NextGen Live API:
PUT /v2/accounts/{account_id}/jobs/{id}For detailed API documentation and examples, see the NextGen Live API Reference.
Viewing Channel Information in the Control Room
The Control Room provides detailed information about your NextGen Live channel. Click on a channel name from the Channels page to open the Control Room, which displays comprehensive channel management and monitoring capabilities.
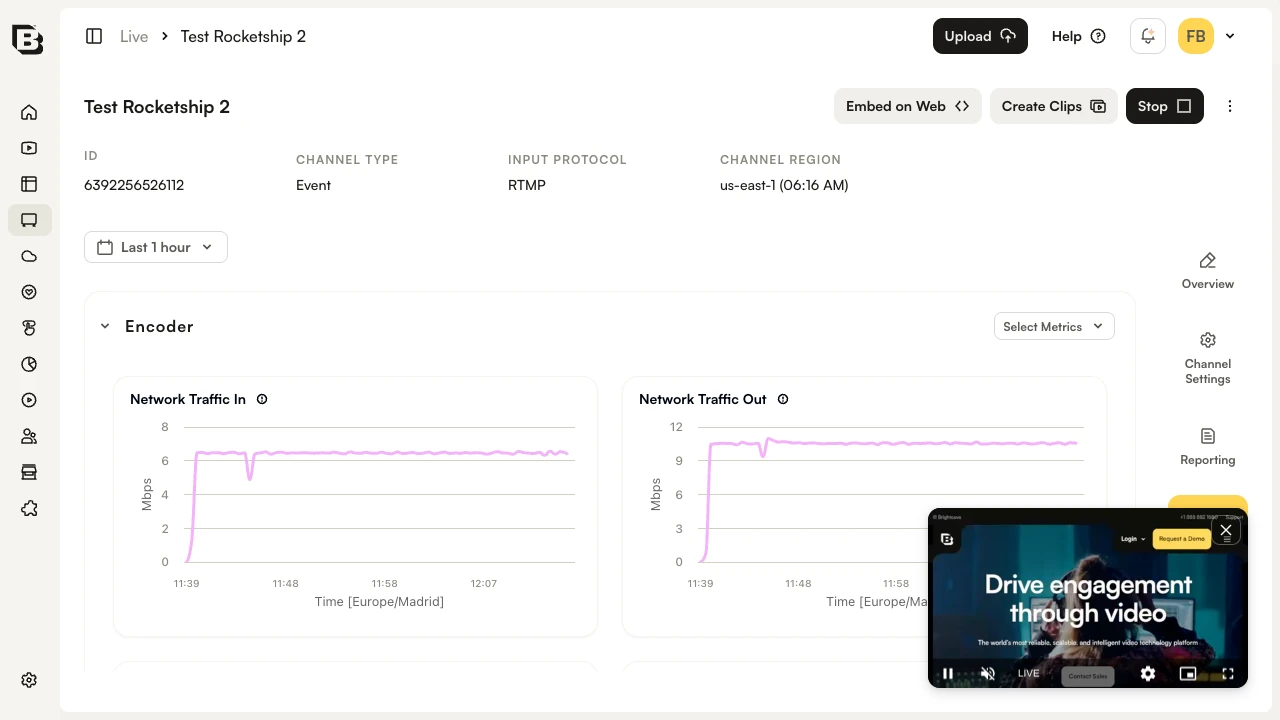
Header
The Control Room header displays the channel name, metadata (ID, Channel Type, Input Protocol, Channel Region), and the following action buttons:
- Embed on Web - Generate embed code for the live stream (see Generating Embed Code)
- Create Clips - Create video clips from the live stream (see Creating Clips)
- Start - Start the channel and make it available for streaming
- Three-dot menu (⋮):
- Edit JSON - Directly modify the channel configuration in JSON format
- Copy Channel ID - Copy the channel ID to the clipboard
- Archive - Permanently archive the channel
Navigation Tabs
The Control Room includes four tabs in the right sidebar:
- Overview - Main channel information and configuration (see below)
- Channel Settings - Opens a modal to edit channel configuration and advanced settings
- Reporting - Analytics and performance reports including Total Views, Unique Viewers, Avg View Time, Total Viewed Time, Ad Starts, and a Concurrent Viewers chart
- Health Monitoring - Real-time streaming metrics and diagnostics including Encoder, Ingest, and Packager metrics
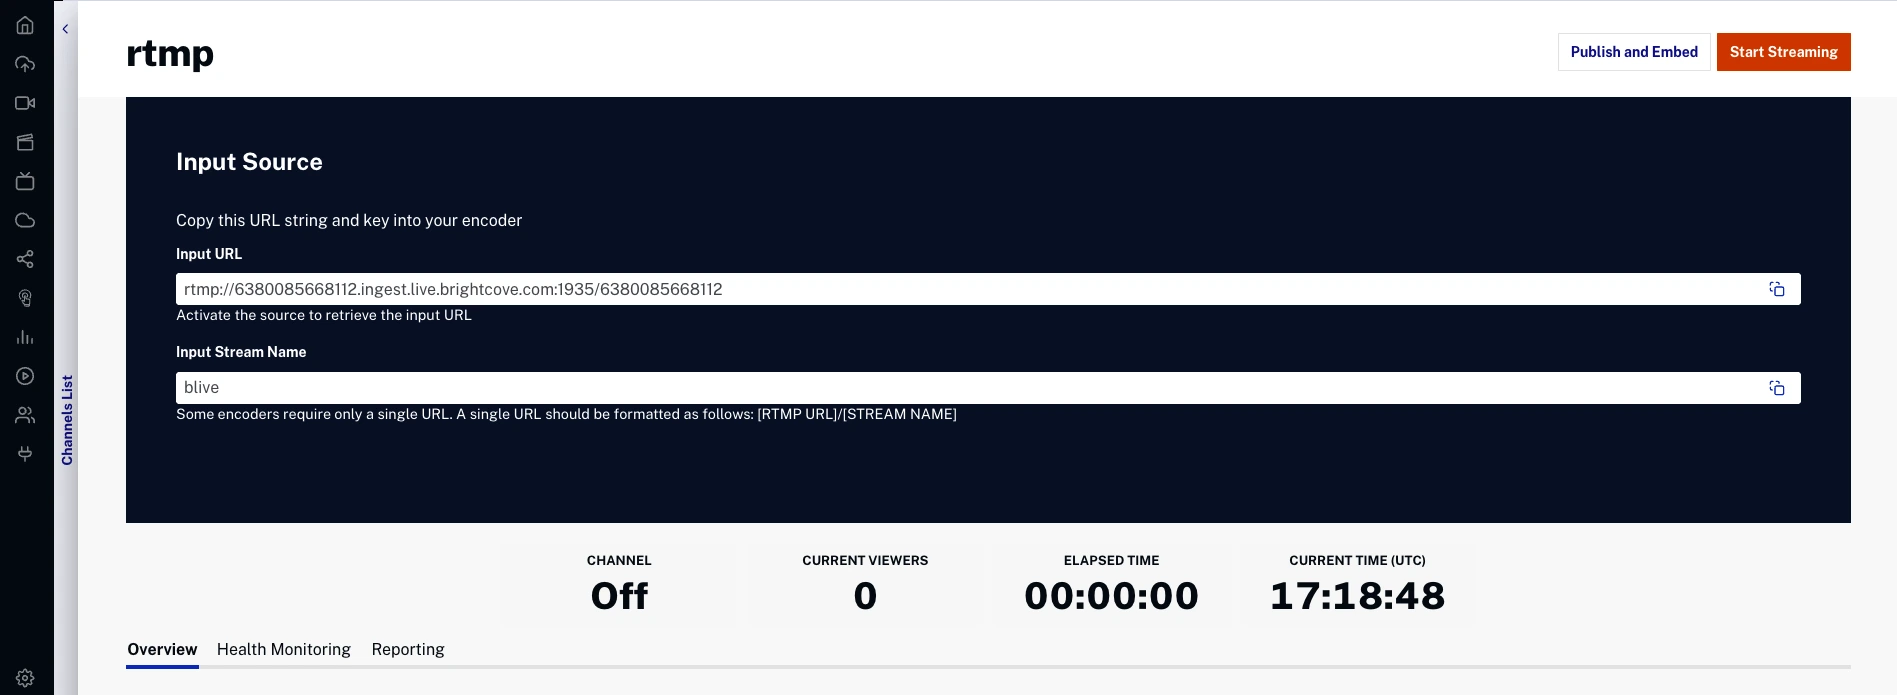
Input Source
The dark Input Source panel displays your encoder connection details:
- Input URL - Endpoint URL for encoder connection (click to copy)
- Input Stream Name - Stream name/key for encoder (click to copy)
Below the Input Source panel, a status bar displays: Channel status (Off/On), Input Source (Connected/Disconnected), Current Viewers count, and Elapsed Time.
Overview Tab
The Overview tab displays accordion sections with channel details:
- Scheduling - Configure automated start/stop schedules. Click Add Schedule to create a new schedule.
- Video Renditions - Displays the video renditions configured for the channel
- Audio Renditions - Displays the audio renditions configured for the channel
- Media Live Asset - Link to the associated media asset in the Media module
- Custom Fields - Displays custom field values assigned to the channel
- Channel URLs - Playback URLs and other channel endpoints
- CDN (Content Delivery Network) - CDN configuration details
- Clips - Lists clips created from this channel. Click Create Clip to create a new clip.
Channel Settings
Click the Channel Settings tab to open a modal with two sub-sections:
- Channel Configurations - Edit the channel name, general settings (audio only, renditions profile, frame rate, region, input protocol), input settings (redundancy), VOD conversion, and view renditions
- Advanced Settings - Edit RTMP Output, Stream Controls, SSAI, Audio Tracks, Notifications, and Maintenance Settings
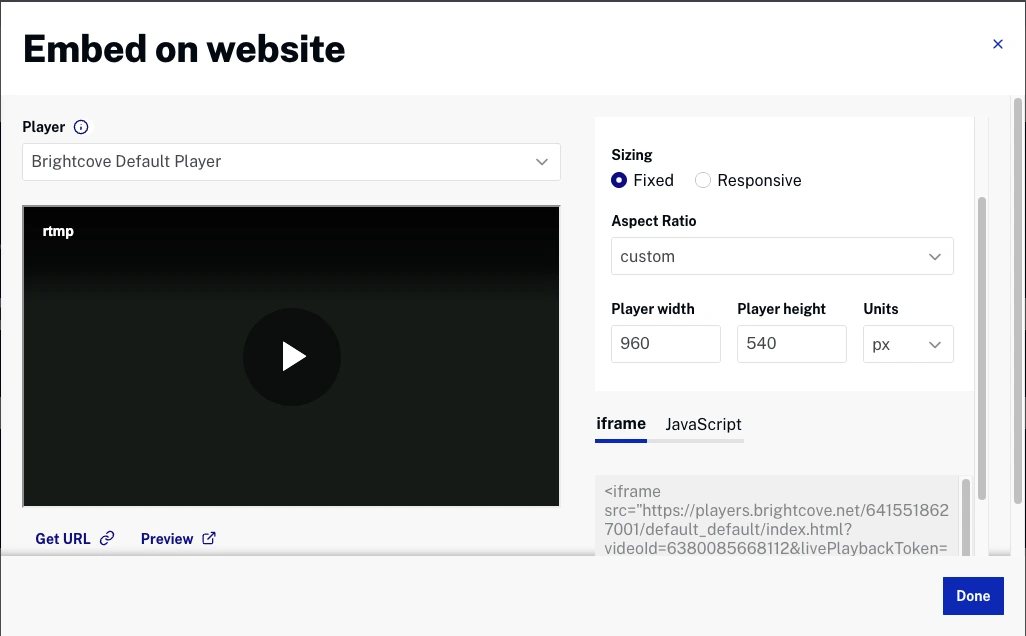
Generating Embed Code for NextGen Live
To generate embed code for a NextGen Live channel:
- Click on a channel to open the Control Room
- Click Embed on Web in the header. The Embed on website dialog will open.
- Select a Player from the dropdown
- Configure sizing options:
- Player Sizing - Choose between Fixed or Responsive sizing
- Aspect Ratio - Select aspect ratio (e.g., 16:9 (Desktop))
- Player width and Player height - Set dimensions in pixels
- Choose embed code type:
- iframe - Standard iframe embed code
- JavaScript - Advanced JavaScript embed code with video-js tag
- Use the action buttons at the top right of the dialog:
- URL - Get the direct player URL
- Preview - Preview the player
- Click Copy to copy the generated embed code
- Click Done to close the dialog
Important Tips
Understanding Playback Tokens
NextGen Live uses the livePlaybackToken parameter to ensure that playback behavior matches the channel’s configuration.
What is livePlaybackToken?
The livePlaybackToken is a JWT (JSON Web Token) generated by the NextGen Live API. It contains encoded configuration details that determine how playback is delivered for a specific live channel.
This may include settings such as:
- DVR availability
- Server-Side Ad Insertion (SSAI)
- DRM configuration
- BYO CDN routing
When is livePlaybackToken generated?
A livePlaybackToken is automatically generated for all NextGen Live channels when the channel is published — even if advanced features are not enabled.
Is livePlaybackToken required?
- Not required for basic live playback without advanced features.
- Required for channels using advanced features (e.g., DVR, SSAI, DRM, or BYO CDN).
- Strongly recommended for all custom integrations, even when no advanced features are configured.
While playback may work without the token, always including it ensures:
- Playback reflects the channel’s intended configuration
- Consistent behavior across environments
- Compatibility with future platform enhancements
What happens if the token is omitted?
If the livePlaybackToken is not included in a Playback API request:
- Playback uses the default live delivery configuration
- DVR functionality is not available
- SSAI endpoints are not used (no ad insertion)
- Channel-specific DRM configuration may not be fully applied
- BYO CDN routing is not applied (default CDN delivery is used instead)
Playback may still succeed, but it behaves as a standard live stream without advanced channel configuration.
Feature dependency overview
| Feature | Requires livePlaybackToken | Behavior if Token Is Omitted |
|---|---|---|
| Basic Live Playback | No | Playback works using default live delivery. |
| DVR | Yes | No DVR window or seek capability. |
| SSAI | Yes | No ad insertion. Playback bypasses SSAI endpoints. |
| DRM | Yes | Playback may not fully reflect the channel’s DRM configuration. |
| BYO CDN | Yes | Playback uses the default CDN instead of the configured BYO CDN. |
Brightcove Player vs Custom Playback API Integrations
Brightcove Player embed codes automatically include the livePlaybackToken.
For custom Playback API integrations:
- Basic live playback works without the token.
- Advanced features require the token.
- Best practice: Always pass the
livePlaybackTokenwhen it is available.
Example Playback URL
https://players.brightcove.net/ACCOUNT_ID/default_default/index.html?videoId=VIDEO_ID&livePlaybackToken=TOKEN_VALUE
Using RTMP Outputs
NextGen Live supports RTMP outputs to stream simultaneously to external platforms like Facebook, YouTube, or custom RTMP endpoints.
To configure RTMP outputs:
- In the Control Room, scroll to the RTMP Outputs section
- Click Add RTMP Output
- Enter the RTMP Output URL (destination)
- Select the Rendition to send:
- Choose a specific quality rendition
- Click Add to start the RTMP output
Monitoring Your Stream
NextGen Live provides comprehensive monitoring capabilities:
Health Monitoring Dashboard
NextGen Live provides comprehensive health monitoring organized into three main sections:
Ingest Metrics (SRT streams only)
- Source Bit Rate - Bit rate of the incoming source
- Source Connected - Connection status (1 = connected, 0 = disconnected)
- Source Disconnections - Count of source disconnections
- Source Dropped Packets - Network packets lost during transit
- Source Packet Loss Percent - Percentage of packets lost
Encoder Metrics
- Network Traffic In/Out - Rate of network traffic to/from encoder
- Source Frame Rate - Frame rate in FPS
- Source Loss Fill Duration - Duration of fill frames used to cover source loss
- Dropped Frames - Input frames dropped by encoder
- Output Audio Level - Audio levels in dBFS and LKFS
Packager Metrics
- Egress Bytes - Bytes successfully sent per request
- Egress Response Time - Time to process each output request
For more information, see Health Monitoring Dashboards.
Creating Clips
NextGen Live supports creating video clips from your live stream:
- Clips can be created while streaming or after the event ends
- Streams are available for clipping for 14 days after the event ends
- Clips are saved as VOD assets in your Video Cloud library
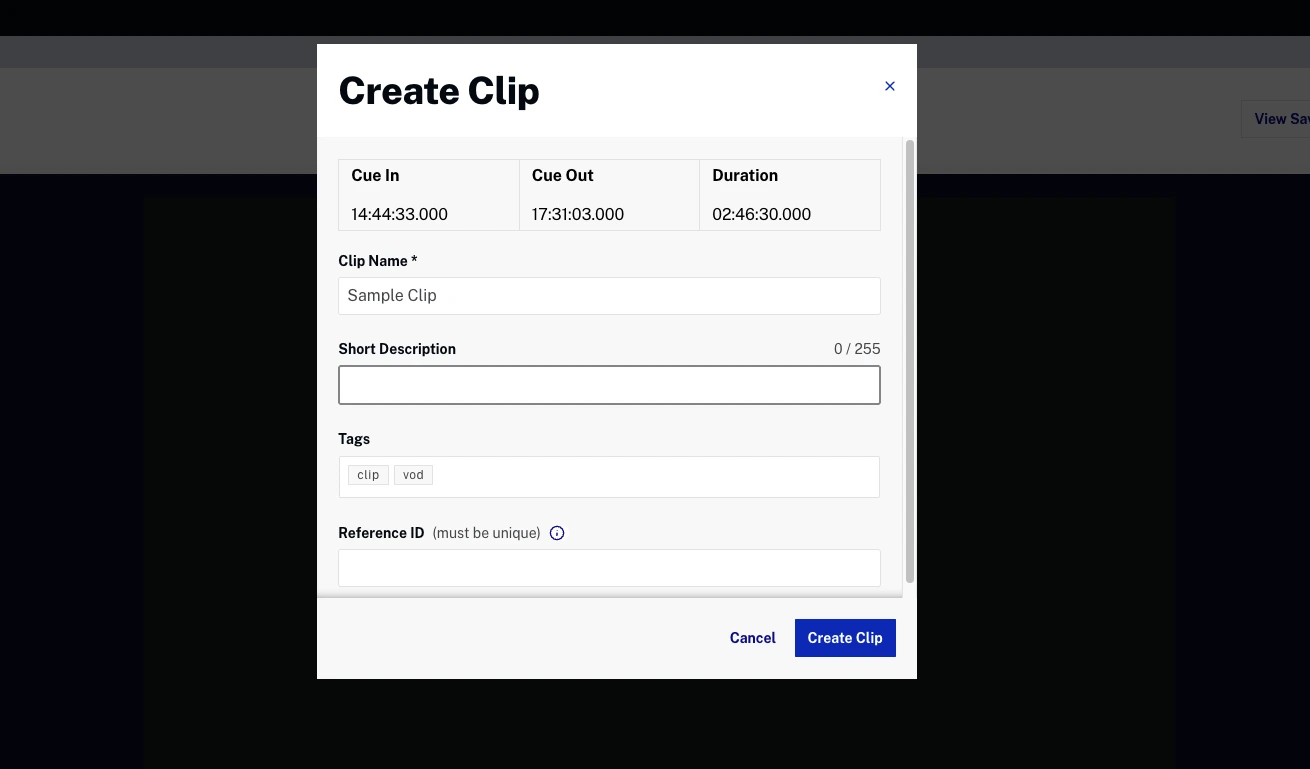
To create a clip:
- In the Control Room, click Create Clip
- Set the start and end times for your clip
- Enter clip metadata (name, description, tags)
- Click Create Clip
Archived Channels
NextGen Live channels can be manually archived and moved to the Archived Channels section of the NextGen Live dashboard. Archiving a channel is a manual action that you perform when you want to remove it from the active channels list.
Notes about archived channels
- There is no limit on the number of channels that can be archived for an account
- Once a channel is archived, it will remain in the archived channels list for 30 days although it cannot be started again
- After 30 days have passed, the archived channel will be automatically removed from the UI
Media Asset Retention
The Live media asset associated with the channel behaves differently depending on whether Live-to-VOD conversion is enabled:
Channels Without Live-to-VOD
- The Live media asset is not deleted when a channel disappears from the UI after the 30-day archive period
- The media asset remains available in the Media Module even after the archived channel is removed from the Live module
Channels With Live-to-VOD Enabled
- When the job is stopped, the Live media asset is overwritten with the Live-to-VOD version
- The converted VOD asset remains in the Media Module and can be accessed even after the archived channel is removed from the Live module