Creating Custom Metadata Fields
Custom metadata can be used to add additional metadata fields to your videos. Custom fields are added as part of your account settings. After the custom fields have been added, the fields can be assigned values using the Media module.
Creating custom fields
To create custom fields, follow these steps.
- Sign in to Video Cloud Studio.
- Open the Admin module. Note that you must be an account administrator to access the Admin module.
- In the Admin sidebar, under Media, click Video Fields. The Video Fields page displays your Custom Fields and the built-in Standard Fields. Review the standard fields before creating any new custom fields, to avoid duplicating a field that already exists.
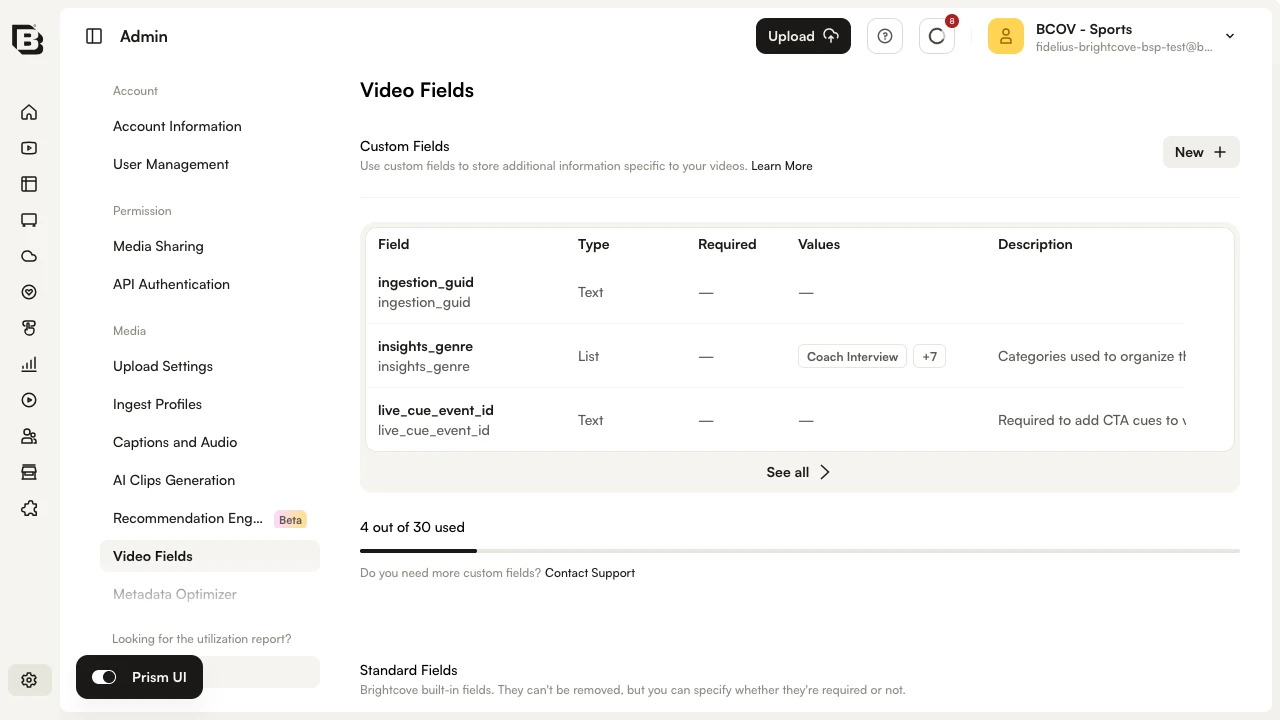
- In the Custom Fields section, click New +. The Add Custom Field dialog opens.
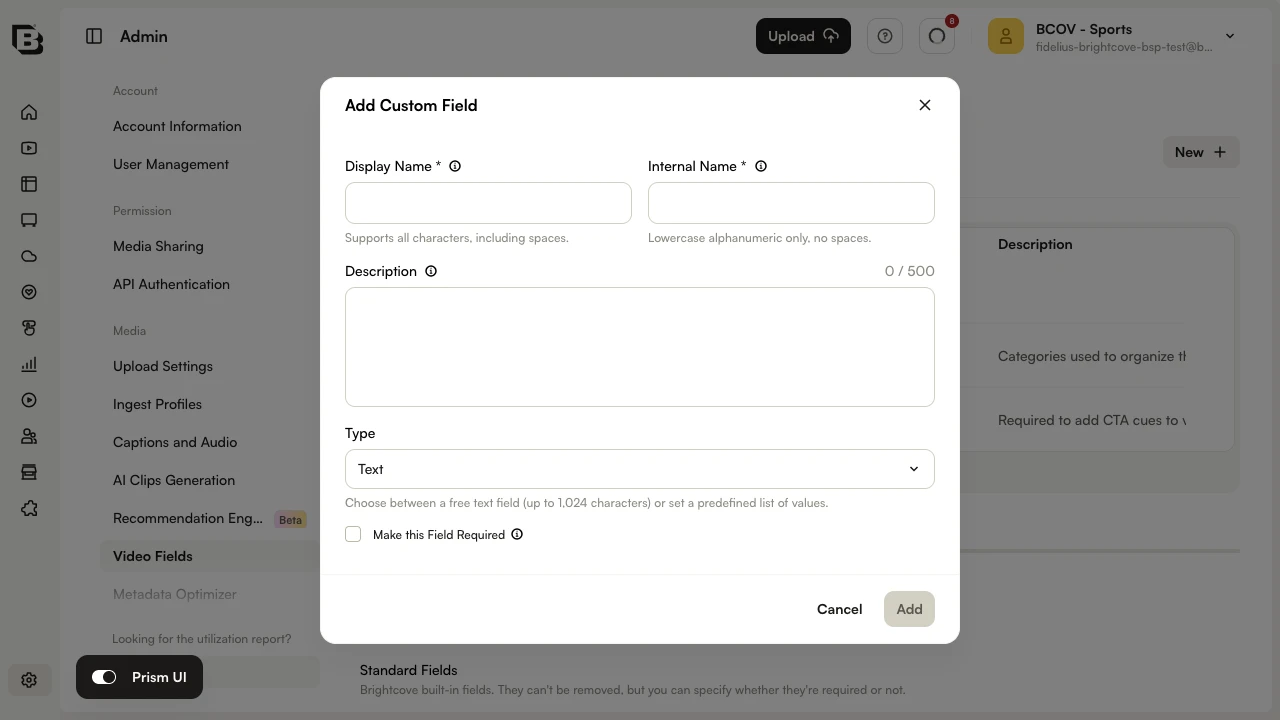
- Enter a Display Name. This appears as the label for the field in the Upload and Media modules. The Display Name field supports all characters, including spaces.
- Enter an Internal Name. The internal name is used when programmatically accessing the field through any of the Brightcove APIs. It accepts lowercase alphanumeric characters only — no spaces or punctuation.
- (Optional) Enter a Description. The description appears as a hint in the Studio interface and supports up to 500 characters.
- Select a Type for the field:
- Text - The user can type anything into the field up to 1,024 single-byte characters (or 512 double-byte characters).
- List - The user selects from a predefined list of values. Lists can have no more than 150 possible values, and each value can be up to 100 characters long.
- If the custom field will be required, select Make this Field Required.
- If your field type is List, enter the values for the list. Each value can be up to 100 characters.
- Click Add to save the new custom field.
Custom fields you create are available immediately and visible in the Media module.
Each account can hold up to 30 custom fields. The Video Fields page shows your current usage (for example, 4 out of 30 used). If you need more, click Contact Support on the Video Fields page to request an increase.
Editing list values
You can add additional values to a List type custom field. Click the custom field name to open it, add the new values, then click Save.
Deleting list values
You can remove existing values from a List type custom field. Click the custom field name to open it, then use the row's overflow menu next to a value and select Delete. Click Save when done.
When a list value is removed, any videos that were previously assigned that value will keep the value. However, if a video with the deleted value is edited, the value is cleared and a new value will have to be selected.
Removing custom fields from an account
To remove a custom field from an account, use the row's overflow menu in the Custom Fields table and select Delete.
Reserved names
There are some reserved words that must not be used as custom field internal names (the display name does not matter). One common name is category. If you use a reserved name as the internal name for a custom field, searches on that field will return no results. If you already have a custom field named that uses a reserved name, you should remove it and replace it with a different name or contact Brightcove Support for guidance.
The following should not be used as internal custom field names.
| category | complete | created_at |
| creationdate | custom_fields | dataimport |
| discriminator | displayname | displayname_analyzed |
| displayname_tokenized | enddate | itemstate |
| lastmodifieddate | mediaid | name |
| playable_now | playstotal | playstrailingweek |
| published_at | publisheddate | publisherid |
| referenceid | referenceid_analyzed | scheduled |
| referenceid_analyzed | schedule.ends_at | schedule.starts_at |
| scheduled | searchtext | searchtext_analyzed |
| startdate | tag | tags |
| text | state | video_type |
Programmatically accessing custom fields
Custom fields can be accessed programmatically using one of the Brightcove APIs. The following developer documents provide more information.